Getting a basic video to play in your React Native app is surprisingly straightforward. At its core, you just need to install the react-native-video library, pull in the Video component, and give it a source URL. This simple setup is the launchpad for all the powerful on-demand and live streaming features we’ll be building.
Building Your First React Native Video Player
Diving into video playback for the first time can seem daunting, but we’ll get a functional player up and running faster than you might think. Let’s skip the heavy theory for now and jump right into a practical example. The idea is to go from a blank slate to a working video component in just a few minutes.
This hands-on approach gives you a tangible win right away, building momentum before we tackle more advanced topics like HLS live streams and custom controls. By the end of this section, you’ll have a clean, reusable component that’s ready to be dropped into a real-world project.
Nailing the Environment Setup
Before we even think about writing code, let’s make sure your development environment is dialed in. Getting this right from the start saves you from a world of headaches and weird bugs down the road. The big three are Node, Watchman, and the native SDKs—Xcode for iOS and Android Studio for Android.
Here’s a quick-fire checklist to run through.
Core Environment Setup Checklist
This table is your quick reference to ensure everything is in place before you start installing packages. If these commands run without errors, you’re good to go.
| Component | Requirement | Verification Command |
|---|---|---|
| Node.js | LTS version (v18+) recommended. Use a version manager like nvm to avoid permission issues. |
node -v |
| Watchman | Essential for the Metro bundler to track file changes and enable fast refresh. | watchman -v |
| Xcode | Latest stable version for iOS development, including command-line tools. | xcode-select -p |
| Android Studio | Latest stable version for Android, with the required SDKs and build tools installed. | adb --version |
Once you’ve confirmed your environment is solid, we can confidently move on to the fun part: adding the video library.
Installing and Linking the Video Library
With our environment ready, it’s time to bring in react-native-video. This library is the go-to choice in the React Native world for a reason. It provides a powerful API that acts as a bridge between your JavaScript code and the device’s native video player capabilities.
First, you’ll install it using your package manager of choice: npm install react-native-video
After the package is installed, you have to connect its native parts to your project. For iOS, this means navigating into your ios directory and running pod install. For modern versions of React Native, Android usually handles this automatically. Still, it never hurts to double-check your Gradle files to be sure. This linking step is what unlocks the device’s hardware-accelerated video decoding, which is absolutely critical for smooth, efficient playback.
React Native has become a true powerhouse for video-heavy apps, driving core features for giants like Facebook and Instagram. It currently holds 35% of the cross-platform mobile development market, and its maturity makes it a trusted choice for enterprise-level applications. You can learn more about how HLS streaming works in our detailed HLS guide.
Integrating Real-Time HLS Live Streams
Playing a local MP4 file is a great first step, but the real magic happens when you bring live streaming into the mix. This is where we level up our simple player to handle a dynamic, real-time HLS (HTTP Live Streaming) feed. HLS is the go-to standard for a reason—it’s built for reliability and intelligently adapts to flaky network conditions, which is a lifesaver for mobile users.
So, instead of pointing our Video component to a static .mp4 file, we’re going to give it a dynamic .m3u8 playlist URL. Think of this as a manifest file that tells the player where to find small, continuous chunks of the video stream as they become available.
Setting Up Your Live Feed
First things first, you need a live feed to display. A classic setup involves using broadcasting software like OBS (Open Broadcaster Software) to push a video stream from your camera or screen to a media server.
This is where a service like LiveAPI comes in handy. It simplifies the whole process by giving you a unique stream key and an RTMP ingest URL. For a detailed walkthrough on getting that configured, you can learn more about setting up a live RTMP stream.
Once you’ve got your stream key and server URL from LiveAPI, you just pop them into OBS. From there, LiveAPI handles the heavy lifting of transcoding your feed in real-time and providing a clean HLS URL for your React Native app to use.
This chart breaks down the basic library setup you’ll need to complete before you can actually render a stream.
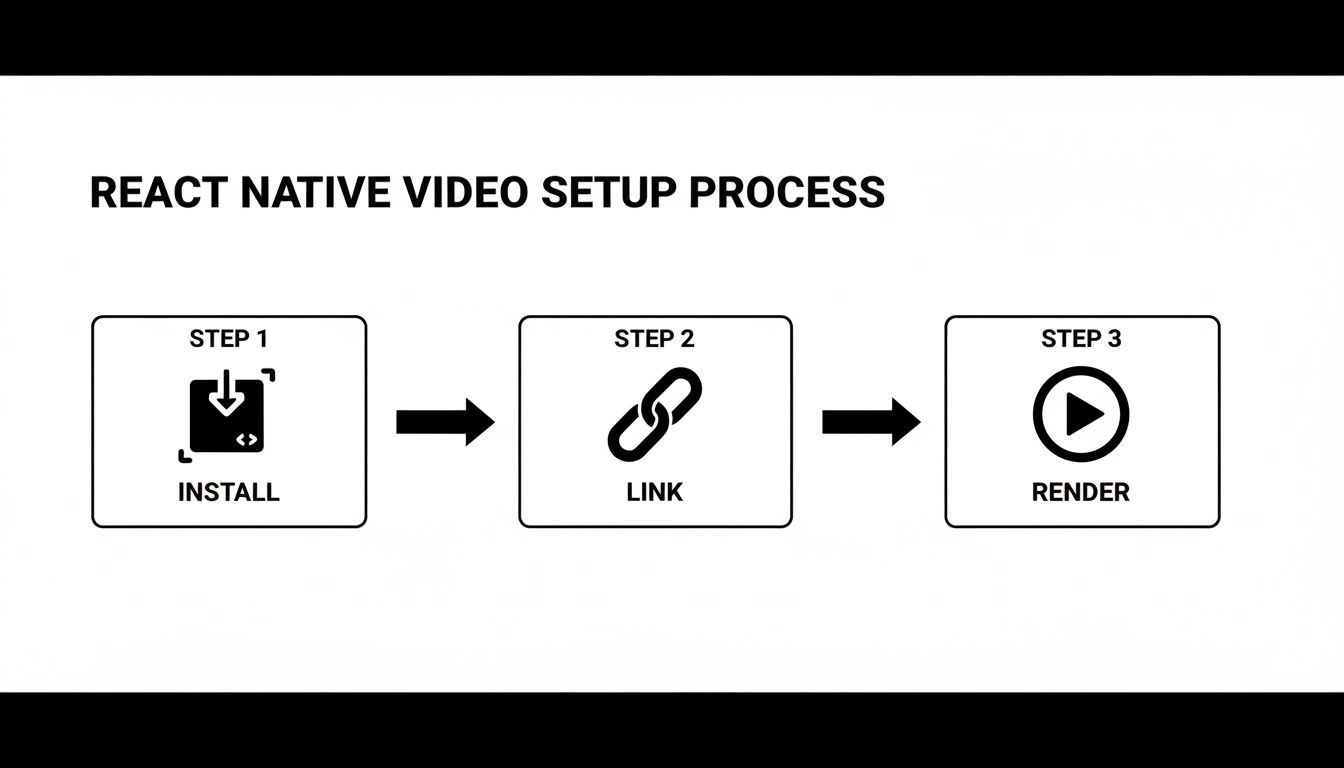
As you can see, it boils down to three core steps: installing the package, linking its native dependencies, and finally, rendering the component in your app.
Implementing the Live Player
Believe it or not, getting a live stream playing is a lot like our previous on-demand react native video example. The main change is that the source prop will now point to your HLS stream’s .m3u8 URL. But to create a polished user experience, we need to account for the unique states of a live broadcast, like buffering.
Let’s tweak our component to track buffering and slap a “LIVE” indicator on the screen. We can tap into the player’s onBuffer callback to know exactly when it’s waiting for more video segments to load.
import React, { useState } from ‘react’; import { View, Text, StyleSheet } from ‘react-native’; import Video from ‘react-native-video’;
const LiveStreamPlayer = ({ streamUrl }) => { const [isBuffering, setIsBuffering] = useState(false);
const onBuffer = (bufferState) => { // The bufferState object contains a boolean isBuffering setIsBuffering(bufferState.isBuffering); };
return ( <Video source={{ uri: streamUrl }} style={styles.videoPlayer} onBuffer={onBuffer} controls={true} paused={false} // Autoplay the live stream /> LIVE {isBuffering && Buffering…} ); };
// You’ll need to define your styles in a StyleSheet here // For example: const styles = StyleSheet.create({ container: { width: ‘100%’, aspectRatio: 16 / 9, // Common video aspect ratio backgroundColor: ‘black’, }, videoPlayer: { position: ‘absolute’, top: 0, left: 0, bottom: 0, right: 0, }, overlay: { position: ‘absolute’, top: 10, left: 10, right: 10, flexDirection: ‘row’, justifyContent: ‘space-between’, alignItems: ‘flex-start’, }, liveIndicator: { backgroundColor: ‘red’, paddingHorizontal: 8, paddingVertical: 4, borderRadius: 5, }, liveText: { color: ‘white’, fontWeight: ‘bold’, }, bufferText: { color: ‘white’, backgroundColor: ‘rgba(0,0,0,0.5)’, padding: 8, borderRadius: 5, }, });
The key thing to remember is that
react-native-videodoes all the complicated work of parsing the M3U8 playlist and fetching video chunks behind the scenes. Your main job is to listen for the events it sends out—like buffering or errors—and update your UI accordingly.
Mastering Adaptive Bitrate and On-Demand Playback
Excellent video quality is a must, but it’s completely undermined if your users are staring at a buffering spinner. This is exactly why Adaptive Bitrate (ABR) streaming is so critical for any serious react native video example. ABR is your best defense against flaky mobile networks, ensuring a smooth playback experience no matter the connection.
The idea behind it is pretty straightforward. Instead of pushing a single, massive video file, ABR offers the player several different versions of the stream, each at a different quality level. The player is smart enough to pick the best one based on the user’s real-time network conditions, seamlessly shifting up or down as bandwidth fluctuates. This little trick is what prevents frustrating stalls and keeps viewers locked in.
The Magic of HLS
The great news is that react-native-video handles all this complexity for you right out of the box when you’re using an HLS stream. If your HLS manifest (.m3u8 file) is set up correctly with all the different bitrate options, the native video players on both iOS and Android take care of the rest. They’ll automatically switch between streams without you having to write a single line of network-sniffing code.
This automatic handling is a huge win. You get to focus on building your app’s features instead of getting bogged down in low-level network logic. The player’s native implementation delivers top-notch performance without any extra JavaScript overhead.
If you’re curious about the nuts and bolts of how it all works, our guide on what adaptive bitrate streaming is and why it matters is a great place to start. Getting a handle on the fundamentals can really help when it’s time to troubleshoot.
Building an On-Demand Video Library
ABR isn’t just for live events; it’s equally important for your on-demand video library. A classic example is building a screen that fetches a list of videos from your API—think of a course catalog or a collection of movie trailers. You’d probably reach for a FlatList or ScrollView to show the thumbnails and titles.
When a user taps an item, you simply pass that video’s HLS URL to your player component. Because each video is an ABR stream, every piece of content in your library gets that same smooth, buffer-free playback experience.
And the performance just keeps getting better. With recent React Native architecture updates like JSI, TurboModules, and Fabric, the framework is closing the gap with fully native performance. It’s now easier than ever to maintain a buttery-smooth 60 frames per second on most devices. The core team is even targeting a render time of just 16.67ms per frame, which cements React Native’s place as a go-to for building high-quality, cross-platform video apps.
Crafting Custom Player Controls and a Better Mobile UX
Let’s be honest: the default video controls are fine, but they’re never going to feel like your app. A great video experience is interactive, not just a passive screen. Building a custom UI overlay is where you get to elevate the user experience, match your brand, and create something truly intuitive.
The secret sauce here is tapping into the callback props from react-native-video. By listening to events like onProgress and onLoad, you get a live feed of data from the player—current playback time, total duration, you name it. This is exactly what you need to power custom controls, like a seek bar that actually works and lets users scrub through content without a hitch.
Building the Core UI Components
First things first, let’s lay out the essential controls. The simplest way to do this is with an absolutely positioned View that sits right on top of your Video component. From there, you can use React state to manage everything, like isPaused or isFullScreen.
I’ve found it’s best to build these out as modular components. Here are the must-haves:
- Play/Pause Button: This just toggles the
pausedstate of the video. The trick is to have it dynamically switch its icon based on whether the video is playing or not. - Seek Bar: This is usually a slider component. You’ll feed its value from the
onProgresscallback and then use itsonSlidingCompleteevent to jump to a new timestamp in the video. - Time Indicators: Simple text components showing the current time and total duration. It’s a small detail, but it gives users crucial context.
- Fullscreen Toggle: A button to programmatically enter or exit fullscreen. This usually involves changing the screen orientation and resizing the player to fill the screen.
Breaking it down this way keeps your code clean and makes the final product feel much more polished.
Handling Mobile-Specific Scenarios
Building for mobile means planning for chaos. A phone call can come in, a user might switch apps, or they might just want to listen while doing something else. A good UX anticipates this.
A classic example is background playback. Just set the playInBackground prop to true, and the audio will keep going even if the user minimizes the app. This is a game-changer for content like podcasts or music videos.
You also have to think about audio interruptions. The onAudioFocusChanged callback is your best friend here. It tells you when another app, like an incoming call, needs to use the device’s audio. You can use this event to automatically pause your video and then gracefully resume it when the interruption is over.
Want to take it a step further? Implement Picture-in-Picture (PiP) mode with the
pictureInPictureprop. This shrinks the video into a small floating window that stays on top of other apps, letting users multitask. It’s a premium feature that users have come to expect.
From a business perspective, choosing React Native for these features is also a smart financial move. Analysis from 2026 shows it can save developers 30-50% on budgets compared to building separate native apps. A live video streaming app takes about 855-1,390 hours to build with React Native; that effort nearly doubles if you have separate Swift and Kotlin teams. You can dive into the full research on this cost-efficiency on TechAhead.
Optimizing Performance and Securing Your Streams
Getting a video to play in your app is one thing; making it perform beautifully and securely for your users is another challenge entirely. A player that buffers endlessly or leaves your content vulnerable isn’t just a technical problem—it’s a user experience disaster. Now, let’s dig into how we can move from a basic implementation to a production-ready one.
The quickest win for performance, especially with on-demand content, is caching. Why make a user re-download a video they’ve already watched? By storing video segments locally, you can slash load times and reduce data usage for repeat plays. You can pair your player with a library like react-native-fs to build a simple but effective local cache.

Securing Your Content Delivery
Leaving your video stream URL wide open is an invitation for trouble. Anyone with the link could easily access and redistribute your content. This is where token authentication or signed URLs become essential.
The standard approach involves your app’s backend generating a short-lived, secure token. Your React Native app then includes this token in the request headers when it asks for the video. Your media server, such as one from LiveAPI, checks for a valid token before sending any video data. It’s a simple, effective gatekeeper ensuring only legitimate users get access.
Securing your streams isn’t just a “nice-to-have” feature; it’s a fundamental requirement for protecting your intellectual property and managing access to premium content. Implementing a token-based system is a standard industry practice for a reason.
Fine-Tuning UI Performance
Performance isn’t just about network speed; it’s also about how the app feels. If your UI animations and controls start to stutter the moment a video plays, the experience feels cheap and clunky. This often happens when the JavaScript thread gets overwhelmed.
The secret weapon here is to offload your animations to the native thread. When using React Native’s Animated API, simply add useNativeDriver: true to your animation config. This tells the device to handle the animation on the more powerful native side, leaving the JS thread free. The result? Your controls and overlays stay silky smooth, no matter what the video player is doing.
Troubleshooting Common Player Issues
No matter how carefully you build, bugs will happen. Knowing where to look first can save you hours of frustration. Here’s a quick guide to some of the most common snags I’ve run into.
Common React Native Player Issues and Fixes
| Issue | Potential Cause | Recommended Solution |
|---|---|---|
| Black Screen on Android | Often a hardware acceleration issue or an unsupported video codec. | Ensure useTextureView={false} is set on the Video component for broader device compatibility. Check if the video format is H.264. |
| No Audio on iOS | The device’s silent switch is on, or there are audio session conflicts. | Use a library like react-native-sound to manage the audio session and configure it to ignore the silent switch if necessary. |
| Video Stutters or Freezes | Network instability, or the JS thread is blocked by heavy computations. | Confirm you’re using Adaptive Bitrate streaming. Offload non-essential tasks from the JS thread and use useNativeDriver for animations. |
Combining this troubleshooting mindset with solid security and performance tuning is what elevates a basic react native video example into a polished, professional application that users will love.
Common Questions About React Native Video
Even with a solid guide, you’re bound to hit a few snags once you’re deep in the code. Let’s walk through some of the most common questions and tricky situations developers run into when working with video in React Native. These are the real-world problems that pop up long after you’ve nailed the basics.
Getting these right can save you a ton of debugging time and give you a much better feel for how the video library actually behaves in the wild.
Can I Play YouTube or Vimeo Videos Directly?
This is easily the most common question I see, and the short answer is no, not directly. The react-native-video library is built to handle direct video sources—think a URL pointing straight to an MP4 file or an M3U8 playlist.
Platforms like YouTube and Vimeo are a different beast. They use their own proprietary players and APIs to stream content, so they don’t give you a simple, direct link to the raw video file.
But don’t worry, you have a couple of good workarounds:
- The WebView Approach: You can always embed the platform’s video player inside a
WebViewcomponent. This is usually the quickest way to get it working, but it comes at a cost: you get very little control over the player’s look and feel. - Use a Dedicated Library: A much better option is to use a package built for the job. For example,
react-native-youtube-iframeis designed specifically to interface with the YouTube IFrame Player API. This gives you far more control over playback than a generic WebView ever could.
How Do I Handle DRM-Protected Content?
If you’re building an app for premium or rights-managed content, you’ll inevitably have to tackle Digital Rights Management (DRM). The good news is that the base react-native-video library includes support for the two major platforms: FairPlay for iOS and Widevine for Android.
To get it working, you pass a drm object within the source prop. This object needs to include details like the license server URL and any custom headers required for authentication, such as a user token.
Be warned: while the library provides the necessary hooks, a full DRM implementation is anything but simple. You’ll need to work hand-in-hand with your DRM provider, like EZDRM or BuyDRM, to configure the license acquisition logic and credentials correctly.
What Is the Best Way to Manage Fullscreen Mode?
Handling fullscreen playback well is more complicated than it sounds. It’s not just about making the video component bigger; you also have to manage screen orientation, hide the system’s status bar, and shuffle your app’s UI out of the way.
While react-native-video does offer a basic fullscreen prop, I’ve found that a truly polished experience requires a bit more firepower. For complete control, I always recommend pairing it with a library like react-native-orientation-locker.
This setup gives you the power to programmatically control the device’s orientation. When a user hits your fullscreen button, you can trigger a function that locks the screen to landscape, resizes the video player to fill the new dimensions, and hides all other UI elements. It gives you precise, predictable control over the entire experience.
Ready to build a powerful, scalable video platform? LiveAPI provides the robust infrastructure you need for live streaming and on-demand video, with seamless CDN integration and developer-friendly APIs. Get started and build your next video application at liveapi.com.