Before you can fix a corrupted video, you need to play detective. The first move is always to figure out why it’s broken. Was it a botched file transfer? A damaged header? Knowing the root cause is the key to picking the right tool for the job.
Sometimes, the fix is surprisingly simple. I’ve seen cases where just renaming the file extension to .AVI and letting VLC Media Player work its magic is enough. But for more serious corruption, you’ll need to roll up your sleeves and dig a bit deeper.
Diagnosing Your Corrupted Video File
Before you jump into any repair attempts, take a moment to understand what went wrong. A successful repair starts with an accurate diagnosis, which can save you a ton of time and keep you from making the problem worse.
Think about a drone operator who just wrapped up an incredible aerial shoot, only to find the footage is a glitchy, unplayable mess. The likely culprit? A faulty SD card that couldn’t keep up during the write process. Or consider a content creator staring at an unreadable project file after their editing software crashed mid-render. In both situations, the cause of the corruption points you toward the most effective repair strategy.
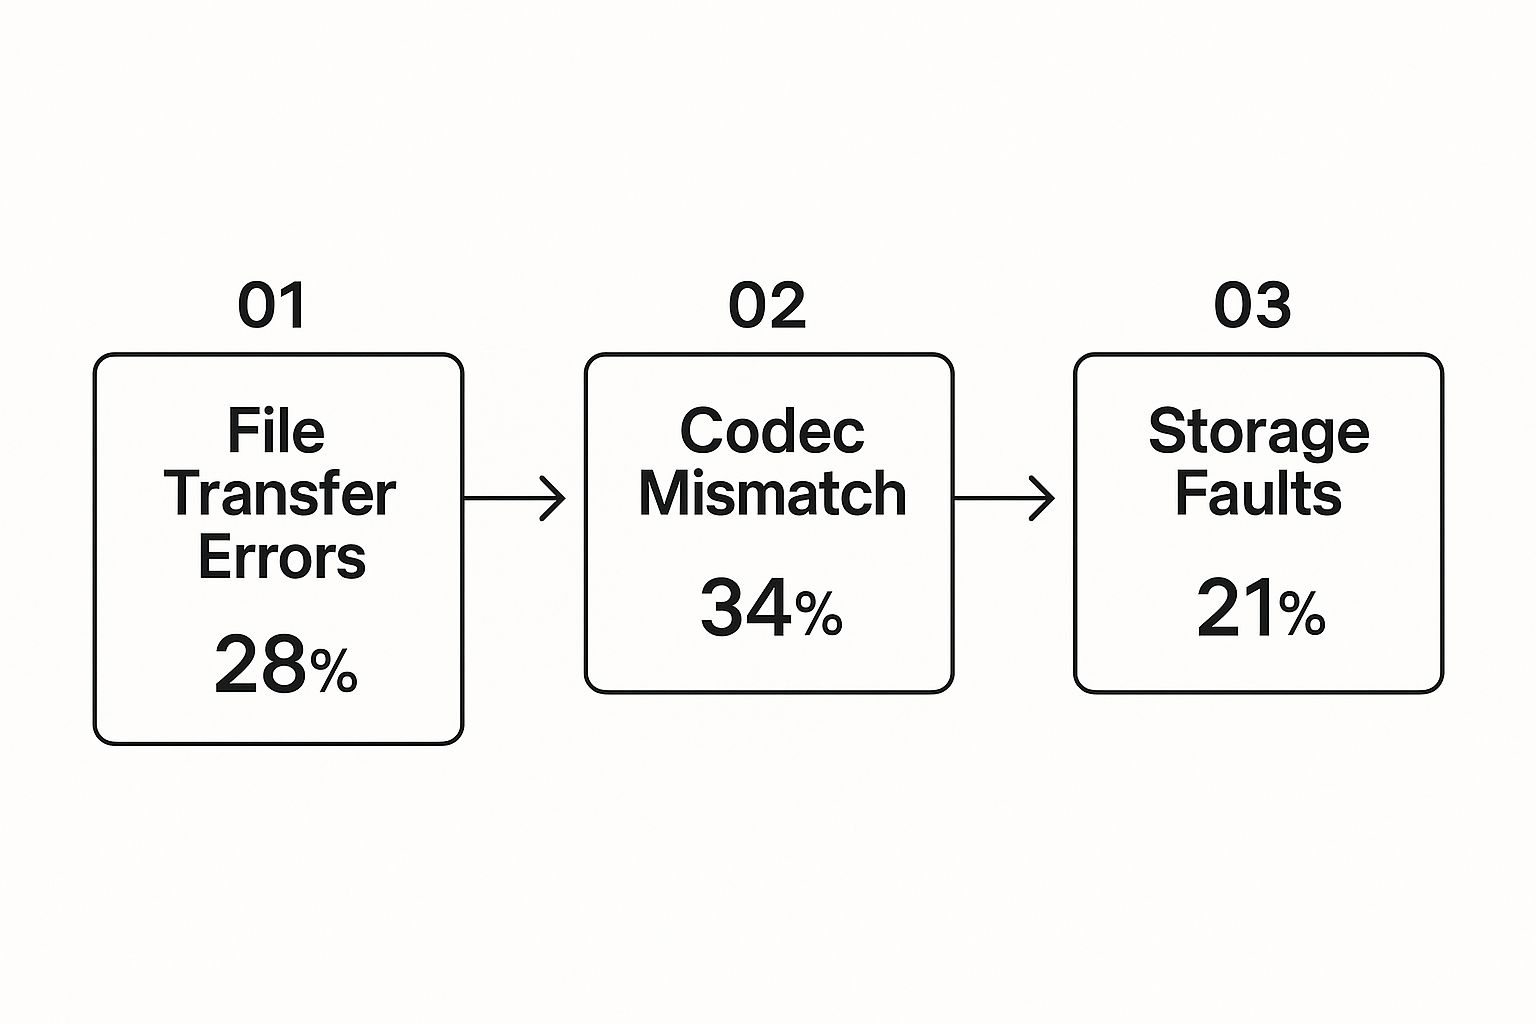
Common Causes of Video Corruption
Most of the time, video file problems fall into a handful of common categories. Your first step is figuring out which one you’re dealing with.
- Incomplete File Transfers or Downloads: This happens all the time. You’re moving a video from one device to another, the connection drops, and you end up with a file that’s missing crucial data.
- Header Damage: The file header is like the video’s table of contents. It holds all the critical metadata—resolution, duration, what is a video codec—that tells a media player how to read the file. If that header gets mangled, the player has no idea what to do.
- Storage Media Errors: SD cards, hard drives, and SSDs don’t last forever. Physical or logical errors on your storage media can introduce corruption when files are being written or read. This is especially common with older, heavily used devices.
- Codec Issues: Sometimes, the file is perfectly fine. The real problem is that your media player doesn’t have the right codec installed to decode and play it back.
By identifying the likely cause, you can select a targeted repair method instead of trying random fixes. For example, a file transfer issue might be solvable with a simple remuxing tool, whereas severe header damage often requires professional software.
This growing need for reliable solutions has fueled some serious growth in the file repair industry. The global market for these tools was valued at around USD 898 million back in 2025 and is on track to grow at a CAGR of 12.5% through 2033. This isn’t too surprising when you consider the explosion of digital content and the constant threat of data corruption from everything from malware to simple hardware failure.
Before you pull out your credit card for a specialized repair service, it’s absolutely worth trying the powerful, free tools already out there. In my experience, a surprising number of playback problems aren’t caused by a hopelessly broken video stream, but by simpler issues with the file’s container or metadata. These are exactly the kinds of problems that free tools are great at fixing.
You don’t have to be a command-line guru to try these, either. The first line of defense is often a program you probably already have installed: VLC Media Player. It’s famous for playing virtually anything you throw at it, but its capabilities go way beyond simple playback.
Quick Fixes With VLC Media Player
VLC has a handy, but often overlooked, repair feature that’s technically built for AVI files. But here’s a little trick: you can use it for other formats like MP4 or MOV, too. The key is to make VLC think it’s dealing with an AVI.
Here’s how you can try this simple workaround:
- First, always make a copy of your corrupted video file. You never want to work on the original.
- Rename the file extension of that copy to .avi.
- Open VLC and head to Tools > Preferences > Input / Codecs.
- Look for the “Damaged or incomplete AVI file” setting and change it to Always fix.
- Hit Save, then try to open your newly renamed .avi file.
When you open it, VLC will attempt to rebuild the file’s index. If the problem was just minor header or index corruption, this quick and easy step can often get your video playing again. It’s a low-effort, high-reward move to try first.
Getting Serious With FFmpeg
When the simple stuff doesn’t cut it, it’s time to bring out the heavy machinery: FFmpeg. This is the Swiss Army knife for anyone who works with video. It’s a free, open-source, command-line tool that can handle almost any video task you can imagine, including some pretty complex repairs.
Yes, it lacks a graphical interface, but for certain types of corruption, its precision is second to none.
As you can see, many issues come from how a video is packaged, not the core data itself. This is where FFmpeg truly excels.
One of the most common and effective fixes is a process called “remuxing.” Think of it like taking everything out of a damaged cardboard box and putting it into a brand-new one. You’re copying the existing video and audio streams into a clean, new container file without re-encoding them. This means there’s zero quality loss.
For a corrupted MP4 file, the command is incredibly simple: ffmpeg -i input_corrupted.mp4 -c copy output_repaired.mp4
This one line instructs FFmpeg to take the file input_corrupted.mp4, copy its internal streams exactly as they are (-c copy), and place them into a fresh container named output_repaired.mp4. This alone often fixes problems caused by a faulty header or bad metadata. This process is actually a core concept in media workflows, and you can learn more about how it relates to video transcoding in our detailed guide.
Pro Tip: If you think the problem might be a specific codec issue, FFmpeg lets you get even more granular. For example, adding
-vcodec h264to your command can explicitly tag the video stream, which can help a player that’s struggling to identify it automatically.
Comparing Free Video Repair Approaches
To help you decide where to start, here’s a quick breakdown of these two popular free methods. Each has its place, and knowing their strengths can save you a lot of time and frustration.
| Feature | FFmpeg (Command-Line) | VLC Media Player (GUI) |
|---|---|---|
| Best For | Structural container issues, metadata errors, index problems. | Minor index corruption, especially with AVI-like files. |
| Ease of Use | Steeper learning curve; requires comfort with command line. | Very easy; uses a familiar graphical interface. |
| Precision | High. Offers granular control over every aspect of the file. | Low. It’s more of an automated, all-or-nothing fix. |
| Speed | Extremely fast for remuxing, as no re-encoding occurs. | Quick for its specific repair function. |
| Versatility | The ultimate video toolkit for a huge range of tasks. | Primarily a media player with a useful, but limited, repair feature. |
Ultimately, starting with VLC is a no-brainer because it’s so easy. If that doesn’t work, graduating to FFmpeg gives you a much more powerful and precise set of tools to solve tougher problems.
Choosing Professional Video Repair Software
When free tools like VLC or command-line workhorses like FFmpeg just can’t get the job done, it’s time to bring in the specialists. Free utilities are great for patching up minor index problems or simple container mix-ups, but they often hit a wall when faced with severe damage.
If you’re dealing with a mangled header, maddening audio-sync errors, or corrupted files from a pro camera, investing in dedicated software is almost always the right move. These professional tools are built from the ground up to tackle the really tough cases—the kind of corruption that renders a file completely unplayable.
I’ve seen it happen countless times: a videographer’s camera battery dies mid-shoot, leaving them with a video file that never got a proper closing header. A free tool will likely choke on that, but a professional application can often rebuild the missing data and save the footage.
Key Features to Look For
Not all paid software is the same, so when you’re ready to repair corrupted video files with a serious tool, you need to know what to look for.
- Broad Format Support: Don’t settle for a tool that only handles MP4s. You need support for professional formats like MOV, MXF, and AVI, plus raw formats from cameras made by Sony, Canon, Blackmagic, and others.
- Preview Functionality: This is a non-negotiable. Never buy software that doesn’t let you preview the repaired video before saving. A clean preview is the best proof that the fix will actually work for your specific file.
- Batch Processing: It’s common for a faulty SD card to corrupt a whole batch of clips from a shoot. The ability to repair them all in one go will save you an incredible amount of time and frustration.
- Reference File Capability: For seriously damaged files, this feature is a lifesaver. The software analyzes a healthy video—shot with the same camera and settings—and uses it as a blueprint to reconstruct the broken one.
The ability to use a reference file is often the single biggest difference between free utilities and professional-grade software. It’s the secret weapon that salvages footage that would otherwise be a total loss.
When Is It Worth the Investment?
Ultimately, paying for software comes down to a simple question: what’s the video worth to you? For a casual phone clip, it might be overkill. But for a wedding videographer with a client’s only copy, a content creator with sponsored footage, or anyone trying to recover irreplaceable memories, the cost is a tiny fraction of the video’s value.
There’s a reason the market for these tools is growing. Driven by everything from hardware failures to software bugs, the global video repair software market is expected to grow at a CAGR of around 13.7% between 2024 and 2030. This demand is fueling reliable solutions from companies like Stellar and Wondershare. You can dig deeper into the video repair software market trends on OpenPR.
These applications work their magic by digging into the underlying video stream, which is almost always built on a common codec. To get a better handle on this, check out our guide on https://liveapi.com/blog/h-264-file-type/, a standard you’ll see everywhere. By weighing the severity of the damage against the importance of the footage, you can confidently decide if a professional tool is your next best step.
Advanced Repair With A Reference File
https://www.youtube.com/embed/tBE_a_NFxIY
Sometimes, a video file isn’t just a little glitchy—it’s fundamentally broken. The most severe corruption often happens when the header, which is basically the file’s instruction manual, is completely missing or destroyed. When that’s the case, free tools will almost always throw their hands up because they have no map to follow. This is where a more powerful technique becomes your best shot to repair corrupted video footage.
Professional repair applications can use a healthy, working video as a blueprint to rebuild the broken one. This “reference file” method is a true game-changer for recovering what looks like lost footage. It works by meticulously analyzing the structure of the good file to figure out how the data in the corrupted file should have been organized.
Think of it this way: your corrupted video is like a book with its table of contents and chapter titles completely ripped out. A simple patch-up job won’t work. But if you have another book from the same author, printed by the same publisher, you can use its structure as a guide to figure out where the chapters in your damaged book are supposed to go. The reference file acts as that intact, trusted guide.
What Makes A Good Reference File
The success of this entire method hinges on the quality of your reference file. You can’t just grab any random video and hope for the best. The closer it matches the corrupted one, the higher your chances of a perfect recovery.
For the best results, your reference file absolutely must be:
- Shot on the same camera or device. This is the single most important factor.
- Recorded with the exact same settings. This means the same resolution, frame rate, bitrate, and codec.
- From the same recording session, if at all possible. This ensures all the subtle, internal camera settings are a perfect match.
If there’s a mismatch in any of these key areas, you’ll likely confuse the repair software. This can lead to a completely failed repair or, at best, a partially recovered file with artifacts. For example, trying to use a 1080p reference file to fix a 4K video is a recipe for failure—their underlying data structures are just too different.
Here’s a pro tip for videographers: if you ever discover a corrupted file, your first move should be to immediately record a short, 10-second clip with the exact same settings on that same camera. This creates a perfect, custom-made reference file that will dramatically increase your odds of success.
When To Use This Strategy
This advanced technique isn’t for minor glitches; it’s the go-to solution for specific, catastrophic failures where simpler methods have no chance. You should turn to a reference file repair when you’re dealing with severe corruption.
This method is most effective for:
- Files with Missing Headers: Often caused by a camera battery dying mid-recording or an unexpected shutdown.
- Severe Data Structure Damage: When the internal “atoms” or “moov” boxes in an MP4 or MOV file are totally unreadable.
- Proprietary Camera Formats: Files from professional cameras like RED, ARRI, or Blackmagic have incredibly complex structures that only specialized software can hope to rebuild.
Ultimately, using a reference file is your last line of defense for irreplaceable footage. It’s a powerful technique that bridges the gap between a simple fix and a total loss, making it an essential tool for any serious content creator or professional who can’t afford to lose their work.
How To Prevent Video Corruption

Fixing a corrupted video is one thing, but avoiding the problem in the first place is the real win. A few smart habits can save you a world of trouble and dramatically lower the chances you’ll ever need those repair skills. Think of it as your first line of defense against losing your hard work.
It’s a lot like maintaining a car—you don’t wait for the engine to blow up to check the oil. Protecting your video files is a continuous process that starts before you even hit record and carries through your entire workflow.
Cultivate Safe File Handling Habits
The simplest actions often make the biggest difference. Most file corruption comes from small mistakes that are surprisingly easy to avoid with just a little discipline.
Let’s start with the absolute basics. Always, always use the “Safely Remove Hardware” or “Eject” function before unplugging an SD card, external hard drive, or USB stick. Yanking a drive out while it’s in the middle of writing data is a surefire way to create an incomplete, unreadable file. It’s one of the most common mistakes I see.
Another game-changing habit is to work from a copy, never the original. The moment you’re done shooting, your first move should be transferring that footage to at least two different storage locations. Don’t even think about formatting that card until you’ve confirmed the files are safe and sound elsewhere.
Protect Your Workflow and Data
Beyond just handling files carefully, you need to build a more robust shield around your entire process. This means protecting your power source and, most importantly, having a solid backup plan.
- Get a UPS: An Uninterruptible Power Supply (UPS) is non-negotiable if you’re doing any serious video work. It’s essentially a big battery that gives you a crucial window of time to save your project and shut down safely during a power outage. A sudden power loss during a file transfer or render is a classic recipe for corruption.
- Verify Your Copies: Don’t just drag and drop files and assume everything worked. After a transfer, do a quick spot-check. Play a few seconds from a couple of clips to make sure they copied correctly. For mission-critical projects, checksum verification tools can give you mathematical proof that the new files are exact duplicates of the originals.
- Keep an Eye on Drive Health: Hard drives don’t last forever. Get into the habit of using built-in tools like Windows’ CHKDSK or macOS’s Disk Utility to scan your drives for errors. This lets you spot a failing drive before it takes your data down with it.
When it comes to backups, the “3-2-1 Rule” is the gold standard. You need three copies of your data, stored on two different types of media, with at least one of those copies living off-site (think cloud storage or a drive at a different physical location).
These practices are especially critical in professional settings. Content platforms manage massive video libraries where corruption from network glitches, encoding errors, or storage decay is a constant threat. This is why reliable data handling is so important, a trend reflected in the rise of cloud-plus-edge computing, which held a 69% market share in video streaming software in 2025. You can dig deeper into the trends in the video streaming software market at Mordor Intelligence. Taking these preventative steps seriously will protect your work and save you from major headaches down the road.
Common Questions About Video Repair
When you’re staring at a corrupted video file, it’s easy to get stuck. After helping countless people with this exact problem, I’ve noticed the same questions pop up over and over. Let’s tackle them head-on and clear up some of the confusion.
Think of this as your go-to reference. It could save you from hours of frustration or, even better, help you salvage a file you thought was a lost cause.
Can I Repair A Video File That Is 0 Bytes?
This is one of the toughest situations, and unfortunately, the answer is almost always no. A file that registers as 0 bytes is essentially an empty shell. It means no data was ever written to it, or the file system has lost all reference to where the data was stored.
There’s simply nothing there to repair. The file is just a name and an icon. Your only real option here is to try and find a backup or run data recovery software on the original storage device—the SD card or hard drive—in hopes of finding the original, intact file.
Will Repairing A Video Reduce Its Quality?
That’s a great question and a totally valid concern. Thankfully, a proper repair job shouldn’t touch the video quality at all. The entire point of the repair is to fix the file’s structure and metadata, not to re-process the actual video and audio.
A good repair tool, or a command-line fix using FFmpeg, focuses on what’s called “remuxing.” This process rebuilds the container around the existing video and audio streams without re-compressing them. A successful repair leaves you with the exact same visual and audio fidelity as the original.
You only risk losing quality when you re-encode or convert a file to a different format, which is a completely different process from a straightforward repair.
My Repaired Video Has Audio But No Picture
Ah, the dreaded black screen with perfect audio. This is one of the most common outcomes of a partial repair. It’s a huge clue: your audio stream is fine, but the video stream itself (or the information needed to decode it) is still broken.
Before you go any further, try these two things first:
- Switch Your Player: Seriously. Open the file in a different, more capable media player like VLC. It has a massive library of built-in codecs and can often power through playback issues that stump other players.
- Remux the File Again: Try copying the streams into a new container. A quick FFmpeg command to turn a
.movinto a.mp4can often rebuild the file’s index correctly and bring the picture back.
If neither of those quick fixes works, it points to deeper corruption within the video stream itself. At that point, you’ll likely need a more advanced, specialized tool that can analyze the raw video data, sometimes using a healthy “reference file” to piece it back together.
Is It Safe to Use Online Video Repair Tools?
I’ll be blunt: I’m not a fan. While the promise of a quick online fix is tempting, you’re handing over your video to a third-party server. That’s a huge privacy and security risk, especially if the footage is personal, confidential, or proprietary.
You also give up almost all control over the process. For these reasons, I always recommend sticking with reputable desktop software. Keeping the repair process local on your own machine means your data stays private and secure from start to finish.
When you’re dealing with video issues, you need reliable infrastructure. LiveAPI provides developers with powerful tools to build robust video applications, backed by industry-leading CDNs for seamless delivery. Learn more about building with our robust APIs.