
When buffering brings your stream to a screeching halt, your first move should always be the simplest. Restart your modem and router, shut down any background apps eating up your bandwidth, and if you can, plug directly into an Ethernet connection. These three steps are your fastest path to a smoother stream, clearing up the temporary glitches that cause most buffering issues.
Your Immediate Fixes for Video Buffering
Nothing kills the mood of a movie night or a live event faster than that dreaded spinning circle. Buffering is simply a sign that the data pipeline to your device got clogged. Before diving into the deep end of technical fixes, let’s cover the quick wins that solve the problem over 80% of the time.
Think of your internet connection as a highway. Sometimes, you hit a temporary traffic jam because of a minor glitch, or maybe too many people are trying to use the same on-ramp at once. The solutions here are all about clearing that jam, and fast.
Triage Your Connection
When buffering strikes, the first thing to do is a quick check-up on the basics. Is your internet connection actually stable? Is someone else in the house downloading a massive file without telling you? These are the questions you need to answer before anything else.
Most of the time, the culprit is something surprisingly simple:
- A tired router: Just like a computer, your router can get bogged down. A quick reboot clears its memory and often resolves weird software hiccups.
- Bandwidth battles: Other devices on your network could be hogging all the speed. Think game consoles downloading updates, laptops syncing to the cloud, or another TV streaming in 4K.
- Weak Wi-Fi: The further you are from your router, the weaker the signal. Walls, floors, and even home appliances can interfere, causing data to drop and your video to buffer.
This image lays out a straightforward, three-step process for troubleshooting on the spot.
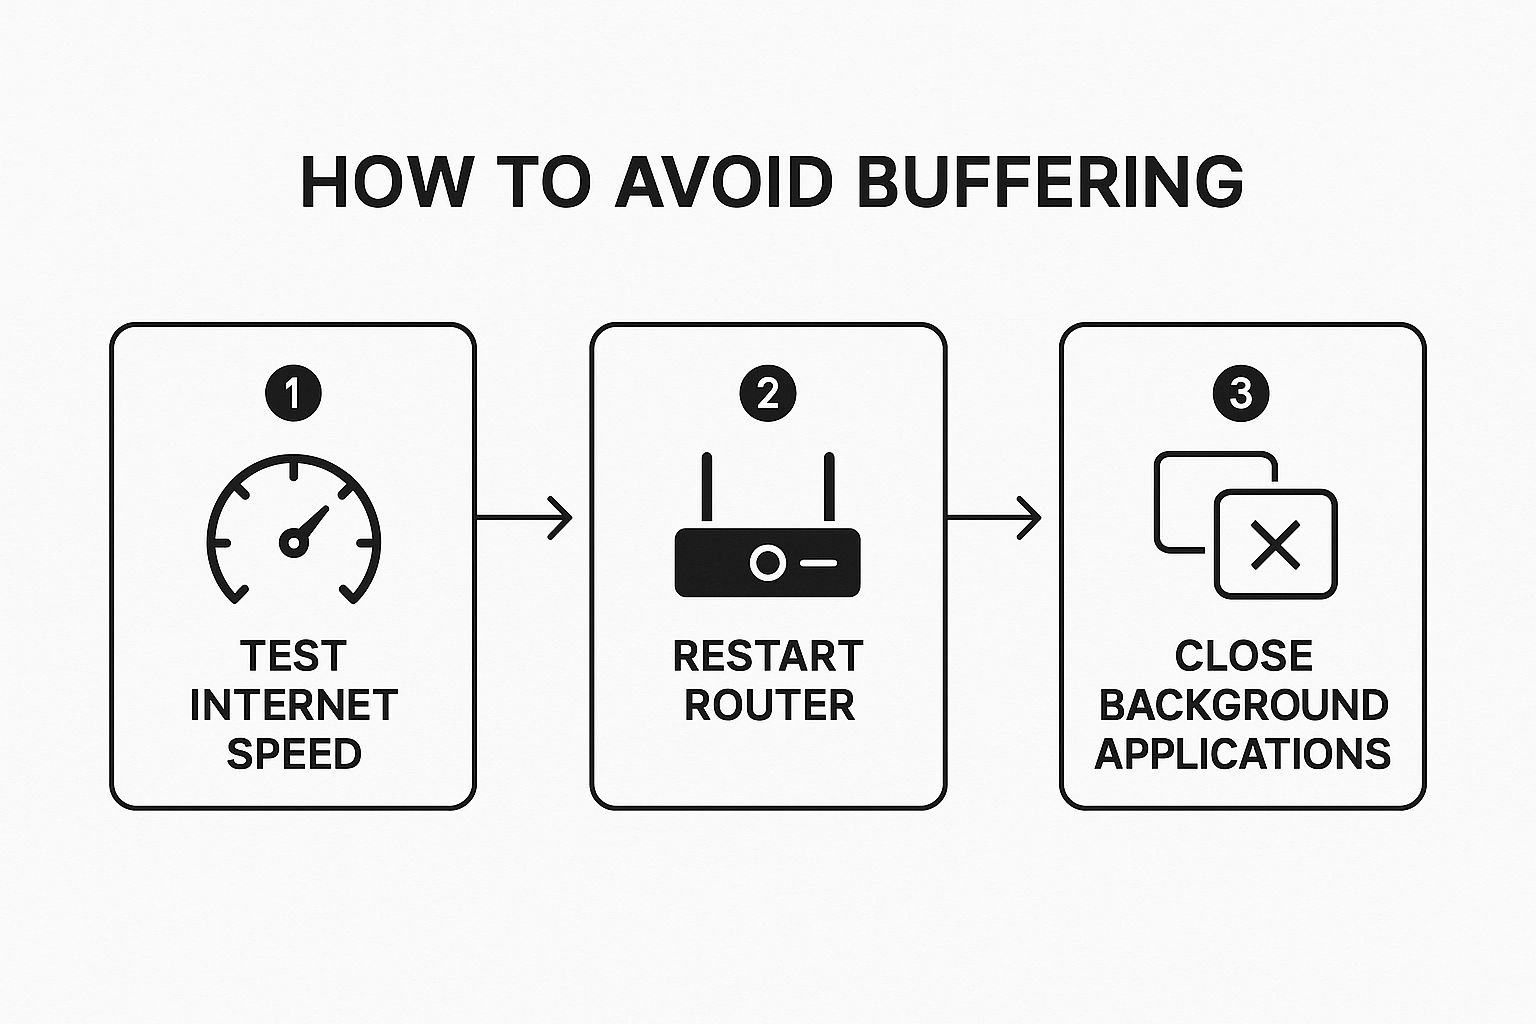
Running through this sequence—checking your speed, rebooting your gear, and managing background tasks—is a methodical way to knock out the most common reasons for buffering.
Practical First Steps
So, let’s get hands-on. Before you even think about calling your internet provider, do a full power cycle. Unplug both the modem and the router from the wall. Go make a cup of coffee or count to 60. Then, plug the modem back in first and wait for all its lights to go solid. Once it’s fully booted, plug the router back in.
This isn’t just a quick on-and-off flick. Waiting that full minute is crucial—it allows the internal capacitors to fully discharge, forcing a complete memory reset that clears out any data conflicts causing the slowdown.
While you’re waiting, do a quick audit of what’s running on your network. On the device you’re streaming from, close out any other apps you aren’t actively using. It’s also a good idea to ask others in the house to pause any big downloads or other high-bandwidth activities, at least for a moment. You’d be surprised how often these small tweaks free up just enough bandwidth to get your video playing smoothly again.
For those moments of frustration, here’s a quick-reference table to help you identify the problem and apply a fix in seconds.
Common Buffering Causes and Instant Solutions
| Problem Area | Quick Solution |
|---|---|
| Network Congestion | Ask others on your network to pause downloads or streaming temporarily. |
| Router Overload | Unplug your router and modem for 60 seconds, then plug them back in. |
| Weak Wi-Fi Signal | Move closer to your Wi-Fi router or switch to a wired Ethernet connection. |
| Background Apps | Close unused browser tabs and applications on your streaming device. |
These simple checks are your first line of defense and will often get you back to uninterrupted streaming without any more hassle.
Understanding Your Internet Speed Test Results
Before you blame your favorite streaming service for that dreaded buffering wheel, it’s worth checking your own backyard. Is your internet connection actually giving you the speed you pay for every month? A quick internet speed test is the best way to get a data-backed answer and start figuring out what’s really causing the lag.

These tests measure a few core metrics, and each one tells a different part of the story about your streaming quality. Getting a handle on them is the first real step toward a permanent fix.
Decoding the Key Metrics
When you run a speed test, you’ll see a dashboard with numbers that can feel a bit abstract. Let’s break down what they actually mean for that movie or live event you’re trying to watch.
- Download Speed (Mbps): This is the headliner. It measures how fast your device can pull data from the internet. For streaming, this is everything—it dictates how quickly video data can get to your screen.
- Upload Speed (Mbps): This is the reverse, measuring how quickly you can send data out to the internet. It’s less of a concern for watching a pre-recorded show, but it becomes critical for live streaming, video conferencing, or online gaming.
- Ping (ms): Often called latency, this is your connection’s reaction time. It’s how long it takes for a signal to travel from your device to a server and back again. A lower ping is always better, especially for live content where every millisecond of delay counts.
Think of it this way: a high download speed is pointless if your ping is through the roof. The stream will still feel sluggish when it tries to start. Your download speed is your car’s top speed, but ping is how fast it jumps off the line when you hit the gas.
What Is a Good Speed for Streaming?
So, what numbers should you aim for? Honestly, it depends. A single person watching a show in standard definition has completely different needs than a family with multiple 4K TVs, laptops, and gaming consoles all running at once.
For instance, a 25 Mbps download speed is technically enough to handle a single 4K stream. The problem is, that assumes nothing else is happening on your network. If someone else hops on a video call or starts downloading a big file, your stream will almost certainly start to stutter. This is where most people get tripped up—they have enough speed for one thing, but not for how their household actually uses the internet.
I’ve found that a family with four or five active users usually needs a 100 Mbps connection to comfortably juggle multiple HD streams, online gaming, and video calls without anyone’s experience suffering. It’s a solid benchmark for a truly buffer-free home.
Even the federal government defines “broadband” as a minimum of 25 Mbps, which is really the floor for modern internet use like 4K streaming. You can dig into provider statistics to see how different services are benchmarked.
Running a test and comparing your results against these benchmarks gives you a clear path forward. If your speed is way below what you pay for, or just isn’t enough for your family’s needs, you’ve just found a huge piece of the puzzle.
How to Optimize Your Home Wi-Fi Network
A fast internet plan is only half the battle. If your Wi-Fi signal is weak, congested, or struggling to get through walls, you’ll still be stuck staring at that dreaded buffering wheel. Think of your home network as the final, critical link between that high-speed connection and your streaming device. Nailing this setup is one of the most effective ways to stop buffering in its tracks.

So many of us are guilty of hiding the router in a cabinet or tucking it away in a corner to keep it out of sight. I get it, but that’s one of the worst things you can do for your signal. Wi-Fi signals are just radio waves, and they need open air to do their job properly.
Give Your Router a Better Home
Where you physically place your router has a massive impact on its performance. It’s like a speaker—the closer you are and the fewer obstacles there are, the clearer the sound. The exact same principle applies to your Wi-Fi.
For the best results, find a central, elevated location. Putting it on a high shelf or a bookcase helps the signal broadcast downward and outward, giving you much better coverage throughout the house. Try to keep it away from thick walls (especially concrete and brick) and large metal objects like refrigerators or filing cabinets, which are notorious signal killers.
It’s also worth noting that other electronics can cause interference. Microwaves, older cordless phones, and even some Bluetooth devices operate on the same 2.4 GHz frequency as many Wi-Fi networks, creating a “noisy” environment that can seriously weaken your connection.
I once helped a friend who was having terrible streaming issues. We did one thing: moved their router from a desk in the corner of a basement office to the top of a central bookshelf on the main floor. The signal strength in their living room TV jumped by nearly 40%. It’s a simple change that costs nothing and can make a world of difference.
Use the Right Wi-Fi Band
Most modern routers are “dual-band,” which means they broadcast two separate networks: a 2.4 GHz band and a 5 GHz band. This isn’t just a technical gimmick; it’s a powerful tool for fighting buffering.
- 2.4 GHz Band: This one is the long-distance runner. It travels farther and is better at getting through walls, but it’s also slower and much more crowded. Just about every Wi-Fi device in your home, plus all your neighbors’ networks, is competing for space here.
- 5 GHz Band: This is the sprinter. It’s significantly faster and way less congested, making it absolutely perfect for bandwidth-heavy tasks like streaming 4K video. The trade-off is that it has a shorter range and doesn’t penetrate walls as well.
Here’s the pro-tip: For your primary streaming devices—your smart TV, Apple TV, or gaming console—always connect to the 5 GHz network if it’s available. This one simple switch often provides an immediate boost in stability and speed. Leave the 2.4 GHz band for devices that are farther away or don’t need a ton of speed, like smart plugs or a thermostat.
Extend Your Network’s Reach
In larger homes or places with awkward layouts, a single router sometimes just can’t cover every corner. If you have those frustrating Wi-Fi “dead zones” where buffering is a constant problem, it might be time to expand your network.
A Wi-Fi extender is a pretty straightforward and affordable option. It just picks up your existing signal and rebroadcasts it to stretch the range.
For a much more seamless and powerful fix, I highly recommend a mesh Wi-Fi system. Instead of one router, you get multiple “nodes” that you place around your home. They all work together to create a single, strong network that covers every square foot. Mesh systems are fantastic at eliminating buffering, especially if you move around, because your device automatically connects to the strongest signal without you ever noticing.
When It’s Time to Upgrade Your Internet and Hardware
Let’s be honest. Sometimes, no amount of fiddling with settings or rebooting your router is going to fix chronic buffering. If you’ve tried all the quick fixes and your streams still stutter and stall, it might be time to look at the real foundation of your connection: your internet plan and the hardware delivering it.
It’s never fun to spend more money, but if you’re dealing with a consistently awful streaming experience, an upgrade is often the only permanent solution. A slow, unreliable connection is a hard limit that no software trick can overcome.
Is Your Internet Plan the Real Bottleneck?
The type of internet connection you have is everything. Older tech like DSL, which piggybacks on phone lines, just wasn’t built for the demands of 4K streaming or a house full of connected devices. Cable internet is a huge leap forward, but its shared nature means you can still get bogged down during prime time when the whole neighborhood is online.
For streaming, fiber-optic internet is the undisputed champion. It transmits data as pulses of light through glass strands, giving you incredibly fast, symmetrical upload and download speeds with almost zero latency. For anyone who’s serious about getting rid of buffering for good, switching to fiber is a total game-changer.
We’re seeing a massive global push for better connectivity. Fiber-optic internet is projected to reach 58.6% of households worldwide by 2025, making this kind of upgrade a real option for more people than ever. New technologies like 5G and advanced satellite internet are also bringing high-speed access to more areas, which you can learn more about in recent internet statistics reports.
If you’re stuck on an old DSL or a budget cable plan and you regularly stream high-definition video, upgrading your plan—especially to fiber—is the single biggest impact you can make.
Don’t Let an Old Router Sabotage Your Speed
Here’s a hard truth: you can subscribe to the fastest internet plan on the market, but if you’re using a router from five years ago, you’re throwing money away. An old router is like putting cheap tires on a performance car—it completely cripples your speed.
Routers from a few years back often can’t handle modern Wi-Fi standards (like Wi-Fi 6) or the constant traffic from multiple smart TVs, laptops, and phones all at once. They get overwhelmed, drop connections, and cause—you guessed it—buffering.
So, how can you tell if your router is the problem?
- It’s more than 3-4 years old. Wi-Fi technology moves fast. An aging router probably lacks the muscle for modern streaming needs.
- Your Wi-Fi speed tests are disappointing. First, plug a computer directly into your router with an Ethernet cable and run a speed test. Then, run the same test over Wi-Fi. If the Wi-Fi speed is dramatically lower, your router is the weak link.
- It’s a single-band model. As we covered earlier, the 5 GHz band is essential for fast, interference-free streaming. If your router only offers the 2.4 GHz band, it’s long overdue for a replacement.
A new, modern router isn’t just a gadget; it’s an investment that unlocks the internet speed you’re already paying for and gets it to all your devices smoothly.
Fine-Tuning Your Streaming Apps and Devices
Even with a blazing-fast internet plan and a perfectly tuned network, the last piece of the puzzle is the device in your hands or the app on your screen. Sometimes, the quickest fix for buffering is to dive into your streaming settings and do a little device-specific housekeeping.
This isn’t about blaming your gear; it’s about ensuring it works with your connection, not against it.

Most streaming services, like Netflix or YouTube TV, default to an “Auto” quality setting. While this sounds helpful in theory, it can backfire on a connection that isn’t perfectly stable. The app might constantly try to jump to a higher resolution than your network can handle, leading directly to that dreaded spinning wheel.
Manually locking in a slightly lower but consistent quality can provide a much, much smoother viewing experience.
Take Manual Control of Video Quality
Instead of letting the app guess what your connection can handle, step in and set the video quality yourself. A steady stream at 720p or 1080p is almost always a better experience than a stuttering 4K stream that pauses every few minutes.
Here’s a quick guide to finding these settings on popular platforms:
- Netflix: Head to Account > Profile & Parental Controls > [Your Profile] > Playback settings. You can pick between Low, Medium, High, or Auto.
- Hulu: While a show is playing, click the gear icon and simply select your preferred quality. Choosing a specific resolution gives you more direct control.
- YouTube: Click the gear icon on any video and go to “Quality.” You can lock it into a specific resolution like 1080p for that viewing session.
By setting the quality level yourself, you’re telling the app exactly how much data to pull. This creates a predictable demand that your internet connection can meet without struggling, which is a fantastic way how to avoid buffering, especially during peak evening hours.
I once worked with a client who was frustrated that their new 4K TV was constantly buffering, even with a high-speed internet plan. The problem wasn’t the connection; it was the TV’s app trying to force the highest quality possible. We manually set the stream to 1080p, and the issue vanished instantly. From their couch, they couldn’t even tell the difference in picture quality.
Perform Essential Device Maintenance
Your streaming device—whether it’s a smart TV, a Roku, or an Apple TV—is just a small computer. And like any computer, it can get bogged down over time with temporary files, outdated software, and a cluttered cache.
Think of it like digital dust. Regularly clearing the cache for your most-used streaming apps can fix a surprising number of performance hiccups by getting rid of old data that might be slowing things down.
It’s also crucial to keep your device’s operating system up to date. These updates often contain critical performance improvements and bug fixes that can directly impact streaming stability.
Prioritize a Wired Ethernet Connection
Wi-Fi is incredibly convenient, but it’s not always the most reliable for streaming. This is especially true for stationary devices like a smart TV or a gaming console. Wi-Fi signals can be weakened by walls, get interference from other electronics, or even compete with your neighbor’s network.
For the most stable, buffer-free connection, always use a wired Ethernet cable if you can.
Plugging your device directly into the router creates a direct, uninterrupted pipeline for data. This simple switch removes signal fluctuation from the equation and guarantees your device is getting the absolute best speed your internet plan can offer. Honestly, it’s the single most effective hardware tweak you can make.
Even after trying the big fixes, some specific questions always pop up. Let’s tackle the most common ones I hear from people trying to get their streams just right.
What’s Really Happening When My Live Stream Buffers?
At its heart, buffering is a speed problem. Your device simply isn’t getting the video data fast enough to play it back smoothly in real time.
Think of it as a supply chain issue. The most frequent bottlenecks are a slow internet upload speed (crucial for streamers), a spotty or crowded Wi-Fi signal, or even an older streaming device that just can’t process the data quickly enough. Something, somewhere between your router and your computer, is holding things up.
Is It True a VPN Can Stop Buffering?
This one is a bit of a “yes, but…” A Virtual Private Network (VPN) can be a game-changer, but only if the problem is ISP throttling. That’s when your internet provider deliberately slows down your connection to streaming sites, especially during busy evening hours. A VPN encrypts your traffic, effectively hiding what you’re doing from your ISP and letting you sidestep those artificial speed bumps.
However, if your internet plan is just slow to begin with or your Wi-Fi is weak, a VPN won’t fix it. In fact, it can sometimes add a tiny bit of latency, so it’s not a magic bullet for every situation.
My Stream Keeps Stopping and Starting. Why?
That classic, frustrating cycle of play-pause-play-pause is almost always a sign of an unstable connection. Your internet speed might be fluctuating wildly, or the network is just too congested. Your device gets a quick burst of data, plays it, and then has to sit and wait for the next piece to arrive.
A perfect example I see all the time is in apartment complexes around 7 PM. Everyone gets home, fires up Netflix, starts gaming, and suddenly the shared network infrastructure is overwhelmed. Maintaining a steady stream becomes nearly impossible, leading to that constant stop-and-start playback.
Your best bet here? Plug directly into your router with an Ethernet cable. It bypasses Wi-Fi interference entirely. It also helps to kick other devices off the network while you’re streaming to free up as much bandwidth as possible.
How Can I Fix Buffering on a Genuinely Bad Connection?
If you know you’re stuck with a weak internet connection, the goal isn’t to find more speed—it’s to become more efficient with what you have. You have to work smarter, not faster.
Here’s how to make the most of limited bandwidth:
- Drop the Video Quality: Manually switching your stream from 1080p down to 720p makes a massive difference. It dramatically cuts the amount of data you need to send and receive.
- Get Wired: I can’t say this enough. An Ethernet cable gives you a rock-solid, stable connection, ensuring you don’t lose any of your precious bandwidth to Wi-Fi flakiness.
- Clear the Network: Ask family or roommates to pause any heavy-duty online activities like large downloads, online gaming, or other video calls while you’re live.
These adjustments help you work within your connection’s limits, giving you the best shot at a smooth stream, even when your internet isn’t cooperating.
Ready to deliver flawless, buffer-free live streams to your audience? LiveAPI provides a robust, developer-friendly platform with adaptive bitrate streaming and a world-class CDN to ensure a seamless viewer experience every time. Get started at https://liveapi.com.