Encoding for streaming is how you take a raw video file—often massive and unwieldy—and whip it into shape for delivery over the internet. It’s a process of compression and conversion, using a codec to shrink the file down while protecting quality, then bundling it into a container that plays nicely with protocols like HLS or DASH. Nail this, and you’ve laid the groundwork for a buffer-free viewing experience.
The Foundation of Flawless Streaming
Before you get lost in API calls and encoding presets, it helps to understand why we even do this. Imagine trying to send a huge, uncompressed 4K video file straight from a camera to someone’s phone. It’s like trying to push a river through a garden hose. The result? Endless buffering and a very unhappy viewer.
Encoding is the clever engineering that solves this problem. It’s all about transforming those bulky source files into small, efficient chunks that can zip across networks of all shapes and sizes. This isn’t just a brute-force shrink ray for video; it’s a sophisticated process of finding the sweet spot between visual fidelity, bandwidth usage, and what a viewer’s device can actually handle.
To give you a better grasp of how these pieces fit together, here’s a quick look at the core components you’ll be working with.
Core Encoding Components at a Glance
| Component | Role in Streaming | Common Examples |
|---|---|---|
| Codec | The algorithm that compresses and decompresses the video data. | H.264 (AVC), H.265 (HEVC), AV1 |
| Container | A digital wrapper holding the video, audio, and metadata together. | MP4, TS (Transport Stream), WebM |
| Streaming Protocol | The set of rules governing how video segments are delivered and played. | HLS, DASH, CMAF |
Getting these components to work in harmony is where the real magic happens. Each choice you make has a direct impact on the final stream.
Key Players in the Encoding Workflow
Let’s break down those components a bit more:
- Codecs (Coder-Decoder): These are the engines of compression. H.264 (AVC) is the old reliable, supported practically everywhere. But newer options like H.265 (HEVC) and AV1 are the future, offering much better compression—meaning you can deliver the same quality at a lower bitrate, saving you money on bandwidth.
- Containers: Think of these as the shipping boxes for your compressed video and audio. MP4 and TS (Transport Stream) are two of the most common you’ll see, each serving as a crucial part of the packaging process for different streaming protocols.
- Streaming Protocols: These are the delivery instructions. Modern adaptive bitrate protocols like HLS (HTTP Live Streaming) and DASH (Dynamic Adaptive Streaming over HTTP) are designed to break the video into tiny segments. This allows the video player to intelligently switch between different quality levels in real-time based on the viewer’s network conditions.
The art of encoding lies in how you configure these elements together. Your codec choice directly affects your CDN bill, while your protocol choice determines how many devices you can reach and how much latency your viewers experience.
This whole process is the engine that keeps the global streaming economy humming. It’s no surprise that the video processing platform market—which powers all this encoding tech—is projected to jump from USD 7.50 billion in 2025 to USD 12.40 billion by 2030. That growth is fueled by the relentless demand for platforms that can handle everything from live sports to on-demand video. You can read more about these video processing market trends at MarketsandMarkets.
Thankfully, you don’t have to build this entire pipeline from scratch. Modern services like LiveAPI abstract away a ton of this complexity. Instead of wrestling with FFMPEG commands, developers can just define the outputs they need through a simple API and let the platform handle the heavy lifting of transcoding, packaging, and preparing content for a global audience.
Choosing the Right Codec: H.264 vs. H.265 vs. AV1
Picking the right video codec is probably the single most important decision you’ll make in your streaming workflow. This choice has a direct ripple effect on your video quality, how much you spend on delivery, and—most importantly—who can actually watch your content. It’s a constant balancing act between compatibility, efficiency, and being ready for what’s next.
Honestly, the best choice isn’t always about the shiniest new tech. It’s about your business needs. Who are you trying to reach? What does your CDN budget look like? What’s your long-term plan? These questions should steer you more than any technical spec sheet.
This decision tree can help you frame the problem: are you someone who needs to get deep into the weeds of codecs and containers, or would a video API that handles this for you be a better fit?
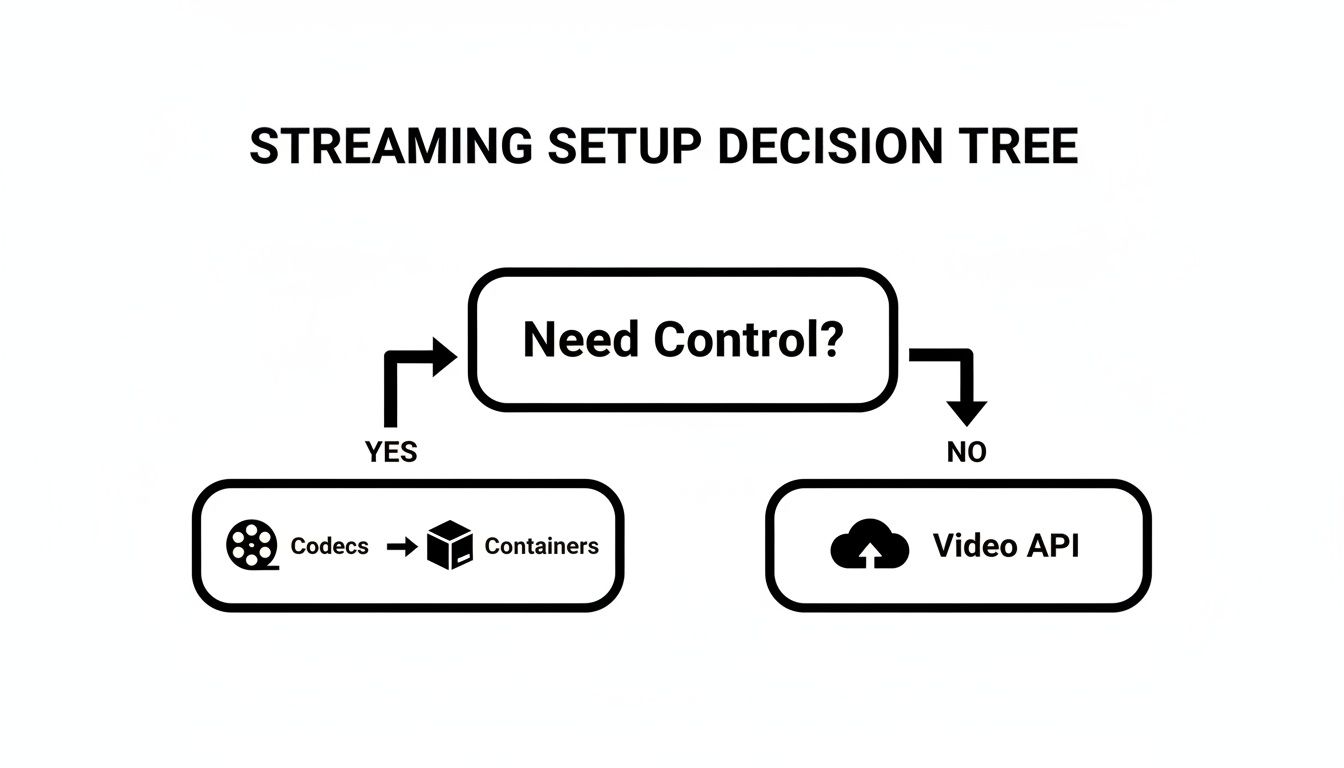
If you need that fine-grained control, let’s dive into the specifics of each major codec.
H.264 (AVC): The Universal Standard
When it comes to compatibility, H.264 (or Advanced Video Coding) is the undisputed king. It’s been the industry workhorse for over a decade, which means it plays back on just about everything—from ancient smart TVs to the newest phones. That universal support is its superpower.
If your main goal is reaching the largest audience possible without a single worry about playback failures, H.264 is your safest bet. It’s also less demanding on the CPU for both encoding and decoding, making it a reliable choice for live streams or platforms with user-generated content where you have zero control over what devices people are using.
The trade-off? Its age is starting to show. Compared to modern codecs, H.264 isn’t very efficient. You’ll need to use a higher bitrate to get the same visual quality, and that translates directly into higher bandwidth and storage costs.
H.265 (HEVC): The Efficiency Powerhouse
H.265, also known as High Efficiency Video Coding (HEVC), is the direct successor to H.264. Its claim to fame is a massive jump in compression—it delivers the same quality as H.264 at roughly half the bitrate. That’s a total game-changer for 4K and HDR content, where file sizes get out of hand fast.
Using H.265 can literally slash your CDN delivery and storage bills. For a large-scale streaming service, those savings can easily run into thousands of dollars every month.
But it’s not a free lunch. The downside comes in two flavors: processing power and licensing. Encoding H.265 is more computationally expensive, which can mean slower and costlier encodes. The licensing situation is also notoriously complex, which has slowed down its universal adoption.
While most modern devices support it, older hardware can definitely struggle. If your viewers are on newer devices and your focus is high-resolution VOD, the bandwidth savings often make H.265 well worth it. For a deeper look, check out our guide on the HEVC video format and its benefits.
AV1: The Royalty-Free Future
AV1 is the new kid on the block, born from the Alliance for Open Media—a group that includes heavyweights like Google, Netflix, and Amazon. Its biggest draw is that it’s completely open-source and royalty-free, which sidesteps all the licensing drama that comes with H.265.
On the technical side, AV1 pushes compression even further, offering up to a 30% improvement over H.265. This makes it incredibly appealing for the big players looking to cut bandwidth costs across millions of viewers.
The catch? Encoding AV1 is even more demanding than H.265, which makes it less practical for real-time live streaming at this stage. Device support is also still catching up. While major web browsers and new hardware are on board, it’s not nearly as widespread as H.264 yet.
Adopting AV1 today is a strategic, forward-looking move. It’s about future-proofing your VOD library for a time when hardware support is everywhere and encoders have gotten faster.
Practical Codec Comparison for Streaming
Choosing a codec isn’t just about picking the “best” one; it’s about picking the right one for your specific needs. This table breaks down the key factors to consider.
| Feature | H.264 (AVC) | H.265 (HEVC) | AV1 |
|---|---|---|---|
| Best For | Maximum compatibility, live streaming, UGC | High-resolution VOD (4K/HDR), saving bandwidth | Future-proofing VOD, large-scale delivery |
| Compression | Good (Baseline) | Excellent (~50% better than H.264) | Superior (~30% better than H.265) |
| Compatibility | Universal (99%+) | Very good (modern devices) | Growing (latest browsers & hardware) |
| Licensing | Simple and widely adopted | Complex and costly | Royalty-free |
| Encoding Cost | Low (fast and cheap) | Medium (slower, more expensive) | High (very slow and expensive) |
Ultimately, many streaming services use a mix. They might encode in H.264 for older devices and offer an H.265 or AV1 version for newer ones. This hybrid approach often provides the best balance of reach, quality, and cost.
How to Build Your Adaptive Bitrate Ladder
Delivering a smooth, buffer-free viewing experience isn’t about creating one perfect stream; it’s about creating several. This is the core idea behind Adaptive Bitrate (ABR) streaming. You’re essentially building a “ladder” of video renditions—a set of streams at different bitrates and resolutions. This gives the video player a range of options to intelligently switch between, all based on the viewer’s real-time network conditions.

Think of it like a car’s automatic transmission. The player seamlessly shifts to a lower-quality “gear” (a lower-bitrate rendition) when the network gets congested, keeping the video playing smoothly. Then, when the connection improves, it shifts back up to a higher quality. It’s this dynamic adjustment that kills the dreaded buffering wheel and keeps people watching.
Your job is to build that set of gears—the ladder—that gives the player the right options for any situation.
Starting with Your Source Resolution
The foundation of your ABR ladder is your highest-quality rendition, which should almost always match the resolution of your source video. If you’re streaming in 1080p, your top rung will be a 1080p encode. From there, you work your way down, creating lower-resolution versions.
A common mistake is creating too many rungs. This doesn’t just drive up your transcoding and storage costs; it can actually confuse some video players, causing them to switch between renditions more than necessary. On the flip side, having too few rungs creates huge quality gaps, making the jump from one level to the next jarring for the viewer.
Pro Tip: I’ve found that aiming for a resolution drop of about 1.5x to 2x between each rung of your ladder works really well. This creates noticeable but not jarring steps. For instance, a solid ladder might step down from 1080p to 720p, then to 540p or 480p, and maybe a 360p version for folks on shaky mobile connections.
This kind of smart encoding is what’s driving the video streaming market, which is projected to surge by USD 725.2 billion by 2029. That incredible growth relies on encoders that can expertly manage multiple broadcast formats, from HLS for live events to DASH for on-demand content, ensuring playback never skips a beat. You can find more data on the expanding video streaming market at Technavio.
Defining Bitrates for Each Rendition
Once you’ve mapped out your resolutions, you need to assign a target bitrate to each one. This is definitely more of an art than a science. The right bitrate depends entirely on the content itself. A fast-paced action movie needs a much higher bitrate at 1080p than a static, talking-head interview does to look good.
That said, you need a place to start. Here are some widely accepted starting points for H.264 encoding that have served me well over the years:
- 1080p (Full HD): 4,500 – 6,000 kbps
- 720p (HD): 2,200 – 3,000 kbps
- 480p (SD): 900 – 1,200 kbps
- 360p (Mobile): 400 – 750 kbps
- 240p (Low Bandwidth): 300 – 400 kbps
These are just guidelines. The real key is to test. Encode a few representative clips from your content and just watch them. Do you see blocky artifacts during high-motion scenes? If so, you probably need to bump up the bitrate for that rendition. For a deeper dive, our guide on adaptive bitrate streaming covers these concepts in detail.
Example ABR Ladder Configurations
A one-size-fits-all approach to ABR ladders can lead to wasted bandwidth or poor quality. Different types of content really do benefit from different structures. Here are a couple of battle-tested configurations you can use as a starting point.
For On-Demand Movies (VOD) This ladder is built for quality, especially at the higher resolutions. It assumes viewers are often on stable home networks with decent bandwidth.
| Resolution | Bitrate (kbps) | Codec |
|---|---|---|
| 1920×1080 | 5,000 | H.264 |
| 1280×720 | 2,800 | H.264 |
| 854×480 | 1,100 | H.264 |
| 640×360 | 600 | H.264 |
For Live Sports Streaming This ladder includes more rungs and much higher bitrates. It’s designed to handle the high motion and complexity of live sports, ensuring smooth playback even during rapid camera pans and fast action.
| Resolution | Bitrate (kbps) | Codec |
|---|---|---|
| 1920×1080 | 8,000 | H.264 |
| 1280×720 | 4,500 | H.264 |
| 960×540 | 2,500 | H.264 |
| 854×480 | 1,500 | H.264 |
| 640×360 | 800 | H.264 |
Building the right ABR ladder is one of the most important steps in any professional encoding for streaming workflow. It has a direct impact on both viewer satisfaction and your operational costs. Start with these established guidelines, but always, always test and tweak your settings to find that sweet spot for your specific content and audience.
Fine-Tuning Your Stream for Performance
Getting your adaptive bitrate ladder right is a huge step, but the real magic that separates a good stream from a great one lies in the details. A few critical settings can make all the difference in stability, latency, and even your delivery costs. These are the tweaks that make your video start faster, seek smoother, and feel genuinely responsive to your audience.
You’ve already built the engine with your codecs and ABR ladder. Now it’s time to pop the hood and dial it in for peak performance.
Why Your Keyframe Interval is a Big Deal
One of the most powerful knobs you can turn is the keyframe interval, which you’ll also see called the Group of Pictures (GOP) size. Think of a keyframe as a complete, high-quality photograph. Every other frame in that group is just a lightweight set of instructions on how to modify that initial photo.
A player has to start playback on a keyframe. It can’t just jump into a frame that says “change the top-left corner” without knowing what was there to begin with. This is why the time between keyframes directly controls how fast your stream can start and how accurately a viewer can skip around the timeline.
For just about any modern streaming setup using HLS or DASH, a 2-second keyframe interval is the gold standard. This simple rule ensures a player is never more than two seconds from a full picture, which is crucial for a snappy startup experience.
If you were to set this to something like 10 seconds, you’d force some viewers to stare at a loading spinner for what feels like an eternity. That’s a surefire way to lose them.
Finding the Sweet Spot with Segment Duration
Next up is segment duration. Protocols like HLS and DASH work by chopping your video into small, digestible chunks (segments) that the player downloads one after another from a manifest file. The length of these segments creates a direct trade-off between latency and overhead.
Shorter segments are your ticket to lower latency, especially for live events.
- For VOD (Video on Demand): When you’re dealing with pre-recorded content, longer segments of 6-10 seconds are ideal. They’re more efficient because the player makes fewer requests to the server, which can reduce your CDN bill.
- For Live Streaming: When every second counts, you need to tighten things up. Shorter segments of 1-2 seconds are essential for getting your delay down. This is the core principle behind low-latency HLS (LL-HLS), which helps get you closer to that broadcast-television feel.
But be warned, super-short segments come at a cost. The player has to constantly check for new manifest files and make far more requests to your CDN. It’s all about matching the segment size to your goal: efficiency for VOD, and speed for live.
Packaging Your Video in the Right Container
After encoding and segmenting, your video needs a home—a container format that bundles the video, audio, and metadata together. This is what the streaming protocols actually work with.
In today’s world, it really comes down to two main options:
- MPEG-TS (Transport Stream): The old guard. It’s the original container for HLS and is known for being incredibly resilient, but it comes with a bit of extra baggage (overhead).
- Fragmented MP4 (fMP4): The modern, streamlined choice. The beauty of fMP4 is that it works seamlessly with both HLS and DASH.
Using fMP4 has become the industry’s best practice for a reason. It lets you encode and package your video just once to serve every device, a concept formalized by CMAF (Common Media Application Format). This “encode-once, deliver-anywhere” approach drastically simplifies your workflow and cuts down on storage costs. No more keeping separate sets of files for Apple and everyone else. It’s a technical decision that pays real operational dividends.
Putting Your Workflow into Practice with a Video API
Okay, so we’ve covered the theory. Now, how do you actually make all this happen? You could spend weeks tinkering with FFmpeg scripts on your own servers, but honestly, that’s a massive headache. A modern video API is the smarter way to go. It handles all the heavy lifting, letting you focus on building your app’s features instead of wrestling with command-line tools and server maintenance.
When you use an API like LiveAPI, you can automate the entire encoding pipeline with just a few requests. It takes care of everything from transcoding your source files into a complete ABR ladder to packaging them for HLS and DASH delivery. It’s simply a faster, more scalable, and frankly, more reliable way to manage video.

Submitting Your First On-Demand Video
Let’s walk through a real-world example: submitting a video for on-demand processing. The whole interaction boils down to sending a JSON payload to an API endpoint. Inside that JSON, you spell out exactly what you need—the codec, resolutions, and streaming protocols.
Say you have a 1080p source video and want to generate a standard ABR ladder for VOD. Your API request would look something like this.
{ “name”: “My First On-Demand Stream”, “source”: “https://source.storage/my-awesome-video.mp4“, “profiles”: [ { “name”: “1080p”, “bitrate”: 5000000, “width”: 1920, “height”: 1080, “codec”: “h264” }, { “name”: “720p”, “bitrate”: 2800000, “width”: 1280, “height”: 720, “codec”: “h264” }, { “name”: “480p”, “bitrate”: 1100000, “width”: 854, “height”: 480, “codec”: “h264” } ], “outputs”: { “hls”: true, “dash”: true } } See how simple that is? You just point to your source file and define a “profiles” array. Each object in that array represents one rung of your ABR ladder, complete with resolution, target bitrate, and codec. Then, you just tell the API you want both HLS and DASH outputs. Done.
This API-driven approach is so powerful because it’s declarative. You aren’t telling the system how to do the encoding; you’re just describing the final result you want. The API figures out the rest, spinning up the right resources to transcode and package your video.
On the backend, the service grabs your request, processes the video in the cloud, and hands you back a master manifest URL. You plug that URL into your video player, and it handles all the adaptive streaming for you.
Configuring a Live Stream with API Presets
The process for a live stream is quite similar, but it’s all about real-time configuration. Instead of a source file, you’ll configure a live stream object that gives you an RTMP or SRT ingest URL. Once you start pushing your feed to that URL, the API gets to work, transcoding it on the fly based on your instructions.
A huge time-saver here is using reusable encoding presets. You can define your perfect ABR ladder for different events—say, one for high-motion sports and another for a simple talk show—and then just apply that preset with a single API call when a new stream kicks off.
Here’s what a request to create a live stream using a preset might look like.
{ “name”: “Weekly Live Town Hall”, “profileId”: “preset-live-sports-1080p”, “outputs”: { “hls”: true, “dash”: true, “lowLatency”: false } }
In this case, all the gritty details of the ABR ladder are tucked away in a profile named preset-live-sports-1080p. You just reference its ID and choose your outputs. You can also easily toggle settings like lowLatency, which automatically adjusts segment durations and other parameters for you behind the scenes.
Of course, when you’re working with APIs, security is paramount. Most video APIs use a token-based system to make sure only authorized requests get through. To get a handle on this critical security layer, check out our post on bearer token authentication for a clear breakdown. This method ensures that only your application can create, modify, or delete your video streams.
By using a video API, you turn encoding from a manual, error-prone chore into a scalable, automated piece of your development pipeline. It gets you out of the business of managing servers and lets you build incredible video features so much faster.
Frequently Asked Questions About Video Encoding
When you get into the nitty-gritty of building a streaming workflow, a lot of the same questions tend to pop up. Let’s tackle some of the most common ones I hear from developers trying to move from theory to a real-world setup.
What’s the Single Biggest Mistake People Make?
Hands down, the most common pitfall is using a single, one-size-fits-all encoding profile for every video. It’s an easy trap to fall into, but it’s incredibly inefficient.
Think about it: a fast-paced basketball game has a ton of motion, detail, and complexity. It needs a much higher bitrate to look good than, say, a static shot of a presenter giving a lecture. Likewise, a screen recording or an animated clip with large blocks of solid color can be compressed much more aggressively without anyone noticing.
When you don’t tailor your encoding presets to your content, you’re either burning cash by over-encoding simple videos or you’re delivering a pixelated, blocky mess to your viewers by under-encoding complex scenes. There’s really no in-between.
This is why using a service with customizable presets is so important. It lets you create specific profiles for “sports,” “animation,” or “webcam,” ensuring you always strike the right balance between quality and cost.
How Do My Encoding Settings Affect Latency?
Your encoding settings, specifically your segment duration, have a massive and direct impact on live stream latency. It’s one of the first things you need to look at if you want to speed things up.
Modern streaming protocols like HLS work by breaking the video into small chunks, or segments. A player typically needs to buffer at least three of these segments before it can start playback without risking a stall. So, if you’re using a default 6-second segment duration, you’ve already baked in a minimum of 18 seconds of latency right there at the encoder. And that’s before the signal even hits the wider internet.
To cut that delay, you have to use shorter segments—usually in the 1 to 2-second range. This is the core principle behind modern low-latency protocols like LL-HLS, which can get you down into that broadcast-like 2 to 4-second glass-to-glass latency range. The trade-off? Shorter segments mean more frequent manifest requests from the player, which can put a little more load on your servers. It’s a classic balancing act between speed and overhead.
Should I Run My Own Encoders or Use a Cloud Service?
I get this question a lot. While running encoders on your own metal gives you total control, it also saddles you with a mountain of responsibility. You’re suddenly in the business of buying and maintaining beefy hardware, patching software, planning for huge traffic spikes, and building out redundancy so a single server failure doesn’t take your entire stream offline.
It’s not just the initial cost; it requires a deep bench of specialized engineers to keep everything running smoothly.
A cloud encoding service, on the other hand, handles all that heavy lifting for you. Here’s a quick breakdown of how they stack up:
| Feature | Self-Hosted Encoding | Cloud Encoding Service |
|---|---|---|
| Initial Cost | High (Hardware purchase) | Low (Pay-as-you-go) |
| Scalability | Manual and limited | Automatic and elastic |
| Maintenance | Your full responsibility | Managed by the provider |
| Expertise | Requires in-house specialists | Not required |
| Time to Market | Slow (requires setup) | Fast (API-driven) |
For almost everyone I talk to, a cloud service is the faster, more reliable, and more cost-effective way to get going. You’re essentially renting a world-class, scalable infrastructure that’s always up-to-date with the latest codecs and formats, turning what would be a huge capital investment into a predictable operating expense.
Ready to stop wrestling with servers and start building amazing video experiences? With LiveAPI, you can launch a professional-grade streaming workflow in minutes, not months. Automate your entire encoding pipeline with our developer-friendly API and deliver flawless video to any device, anywhere. Explore our powerful features and start building today.