Remember when DVR meant that clunky box under your TV? It was a game-changer, freeing us from the tyranny of network schedules. Today, that same power—to pause, rewind, and replay live events—is at the heart of modern streaming, but the box is gone. Now, it’s all about the cloud.
Modern DVR is a feature baked directly into streaming platforms, recording live video in real-time so viewers can watch it on their own terms. It’s the magic that turns a fleeting live moment into a permanent, interactive experience.
The New Era of Digital Video Recording

The whole concept has been turned on its head. We’ve moved from a physical hard drive tethered to your cable box to a sophisticated network-based service, often called cloud DVR or cDVR. This is the technology powering the live features on platforms like YouTube TV, Hulu + Live TV, or even custom apps built using platforms like LiveAPI.
This shift from hardware to the cloud isn’t just a technical detail; it’s a massive leap in flexibility for everyone. Viewers are no longer stuck in the living room. They can start a recorded game on the big screen, then pick it up right where they left off on a tablet during their commute. It just works.
Why DVR Still Matters
With massive on-demand libraries from Netflix and others, you might think DVR is a relic. Not even close. For anything happening live, DVR is essential. In fact, a recent study found that nearly half of all adults still tune into live TV first, especially for big cultural moments like sports or news.
DVR elegantly bridges the gap between the thrill of a live broadcast and the convenience of on-demand.
For developers and streaming providers, building a solid DVR system is a no-brainer.
- A Better User Experience: You’re giving viewers total control. Missed the first 10 minutes? No problem, just start from the beginning. It completely removes the friction of “appointment TV.”
- Deeper Engagement: Features like instant replay during a game or pausing a live press conference keep viewers glued to your platform for longer.
- New Monetization Paths: You can create premium tiers that offer longer recording windows or unlimited storage, opening up brand new revenue streams.
The real value isn’t just about recording shows anymore. It’s about delivering a fluid, watch-anywhere experience that ensures your audience never misses a second, no matter their schedule or device.
At its core, modern DVR is the architectural backbone that makes live streams feel as flexible and easy to use as a simple video file. It’s the behind-the-scenes engineering that lets you pause a live soccer match, rewind a critical debate, or save a concert to watch later—all happening effortlessly in the cloud.
How DVR Streaming Actually Works
So, how does this all happen behind the scenes? Let’s pull back the curtain. Think of it as a digital assembly line in the cloud that’s always running—simultaneously broadcasting a live event while meticulously archiving it piece by piece. This dual process is what makes time-shifting possible, and it all boils down to a few key stages.
This entire workflow is built for speed and reliability. It’s what allows a viewer to hit pause on a live game, rewind to a key moment, or start a broadcast from the very beginning, all without interrupting the live feed for everyone else. It’s a continuous cycle of receiving, slicing, storing, and indexing video content.
Stage 1: The Live Stream Ingest
It all starts the moment a live video feed arrives at a streaming server. This is called ingest. Picture it as the loading dock where raw video material is delivered. The feed could be coming from a professional camera at a sports stadium, a remote news broadcast, or a gamer’s live session.
The ingest server has one primary job: receive this single, continuous stream of data without a hitch. It’s the gateway for the entire DVR workflow, and if the ingest isn’t stable, the whole process downstream falls apart.
Stage 2: Slicing the Video into Chunks
Once ingested, the live stream can’t just be saved as one giant, hours-long file. That would be a nightmare for any video player to navigate. Instead, the video is immediately sliced into small, manageable segments in a process known as chunking.
These chunks are typically just a few seconds long, usually somewhere between two and ten seconds. This is a critical step. Modern streaming protocols like HTTP Live Streaming (HLS) and Dynamic Adaptive Streaming over HTTP (DASH) are built entirely around this concept. Breaking the video into small pieces allows a player to seamlessly switch between different quality levels (adaptive bitrate) and request only the specific parts it needs to play.
For DVR streaming, this chunking happens in real-time as the live event unfolds. Each new chunk is a tiny snapshot of the broadcast, ready to be saved and served up on demand.
Stage 3: Storage and the Manifest File
As each video chunk is created, it’s immediately saved to a storage system. This is often cloud storage like Amazon S3 or Google Cloud Storage. This process builds a growing library of video segments that represents the recorded history of the live stream. If a stream has been live for an hour, you’re looking at hundreds of these small files, all stored and ready for playback.
But how does a video player know which chunks to request and in what order? That’s where the manifest file comes in. The manifest is essentially an ever-updating table of contents or a playlist for the video stream.
A manifest is a simple text file that contains a list of all available video chunks and where to find them. As new chunks are created and stored, the manifest file is constantly rewritten to include them, giving the player a complete map of the recorded content.
When a viewer wants to rewind, their player simply consults the manifest, finds the URLs for the older chunks, and starts requesting them. It’s that straightforward.
Stage 4: Player and CDN Interaction
Finally, the viewer’s video player pulls it all together. When you press play, the first thing the player does is download the manifest file. To watch live, it requests the newest chunks listed at the end of the manifest. If you decide to rewind, it just moves back along the manifest’s timeline and starts requesting older chunks from the Content Delivery Network (CDN) where they are stored.
This entire sequence—ingest, chunking, storage, and manifest updates—happens continuously and automatically in the background. It’s this elegant, high-speed architecture that delivers the seamless DVR experience viewers have come to expect. The live stream keeps moving forward, while its entire history becomes instantly accessible, one chunk at a time.
Choosing Between Cloud and Local DVR
Deciding on the right DVR architecture is one of the most fundamental choices you’ll make for a streaming service. This isn’t just some backend technical detail; it’s a strategic decision that directly shapes the user experience, your operational costs, and how easily you can grow. The two main roads you can take are Cloud DVR, where recordings live on network servers, and Local DVR, where content is stored on the viewer’s own device.
Forget a simple pros-and-cons list for a moment. The real question comes down to your business model and what your audience truly values. Are you building a seamless, “it just works” experience that’s accessible everywhere? Or are you empowering users with total control, letting them own their recordings and watch offline? Each path comes with its own set of trade-offs around storage, cost, and user freedom.
What Is Cloud DVR?
Cloud DVR is the engine powering nearly every major live TV streaming service out there today. The best way to think of it is as a massive, shared library in the sky. When a user hits “record” on a show, your service stores a single master copy in the cloud. Every other subscriber who records that same show is simply given a pointer to that one file. It’s an incredibly efficient and scalable model.
The killer feature here is effortless accessibility. A viewer can start watching a recorded game on their big-screen TV, pause it, and pick it right back up on their phone during their commute. There’s no hardware for them to buy or manage, no storage limits to hit (from their perspective, anyway), and the experience feels the same no matter the device. For developers, this translates to less maintenance and fewer support headaches.
This centralized, hassle-free approach has lit a fire under the market. In fact, the global Cloud DVR market is on track to grow by a staggering USD 38.45 billion between 2025 and 2029, largely because it blends so well with modern hybrid tech.
The diagram below breaks down the basic flow that makes this all possible—it’s the architectural backbone of any cloud-based DVR system.
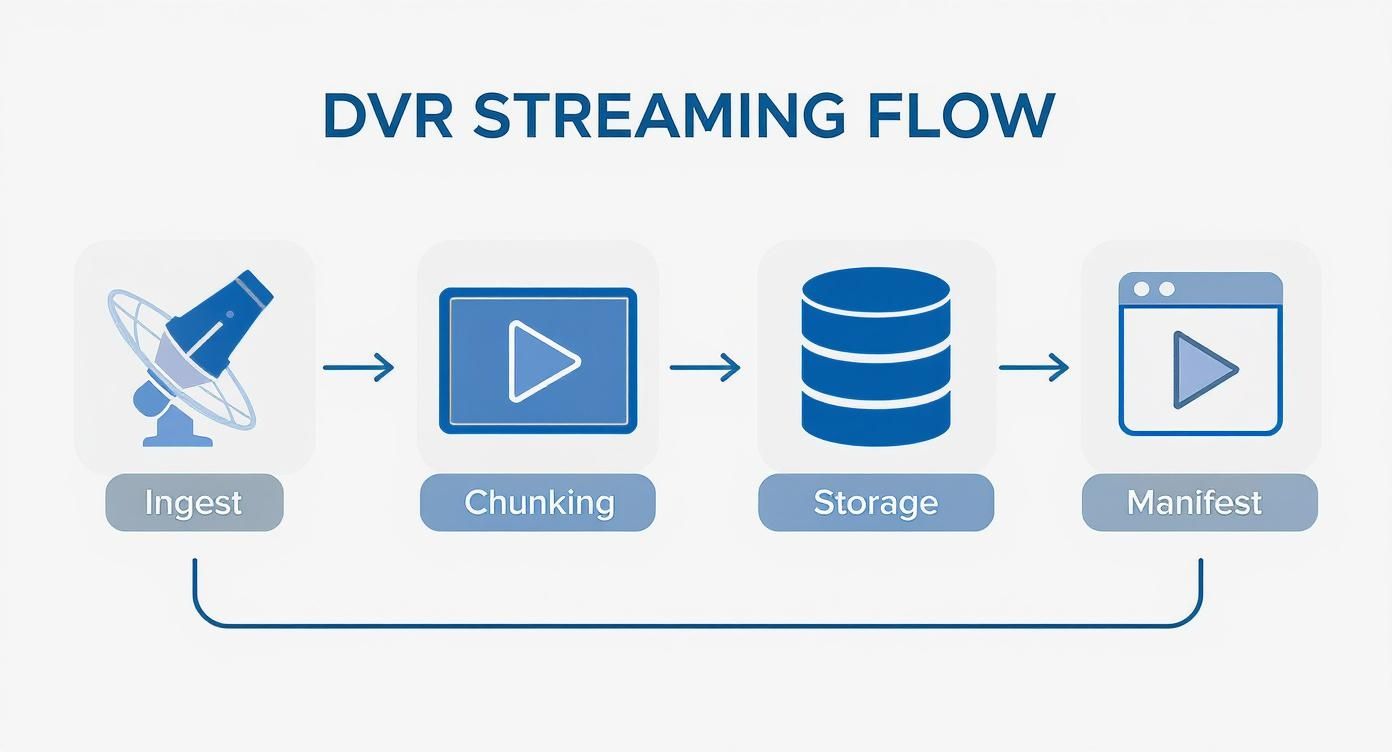
This process—ingest, chunking, storage, and manifest creation—is what allows a single recording to be served up to thousands or even millions of viewers simultaneously.
How Does Local DVR Work?
Local DVR, on the other hand, puts the user back in the driver’s seat. Here, recordings are saved directly onto a physical device. That could be a dedicated set-top box, a personal computer, or even a network-attached storage (NAS) drive tucked away in a closet. This approach is all about user autonomy, privacy, and offline access.
The biggest win? Users truly own their recordings. They aren’t at the mercy of complex content rights agreements that can make a cloud recording suddenly disappear. Plus, it’s the only way to get true offline viewing, which is a lifesaver for anyone who travels or lives in an area with spotty internet. For those who love the idea of a self-hosted setup, our guide on how to build a home server is a great starting point.
But there’s a catch. Local DVR introduces complexity for everyone. Users have to worry about managing their own storage space. As the developer, you have to build an app that can juggle downloads, storage management, and playback across a wild variety of hardware.
Cloud DVR vs Local DVR Feature Comparison
To really see where each model shines, it helps to put them side-by-side. This table breaks down the key differences across the attributes that matter most, from technical architecture to the end-user experience.
| Feature | Cloud DVR | Local DVR |
|---|---|---|
| Scalability | High (infinite cloud storage) | Low (limited by user’s hardware) |
| Accessibility | Access from any device | Limited to the specific device |
| Maintenance | Managed by the provider | Managed by the end-user |
| Offline Access | Generally not available | A primary feature |
| Content Rights | Recordings can expire | Recordings are permanent |
| Cost Model | Operational expense (storage/egress) | Upfront hardware cost for the user |
| Privacy | User data stored on provider servers | Recordings stored privately by user |
Ultimately, the choice boils down to your core offering. Cloud DVR is built for convenience and massive scale, making it the go-to for large subscription services. Local DVR, in contrast, serves a smaller but passionate audience that values ownership and offline freedom above all else.
The Technology Powering DVR Streaming

To build a solid DVR streaming video service, you have to get your hands dirty with the protocols and architecture that make it all work. At its core, modern streaming DVR is really just a clever twist on the same tech that delivers live video. The magic isn’t in inventing a new type of video; it’s in how you manage and store the one you already have.
This is where we get into the nuts and bolts. The entire system is built on adaptive bitrate streaming protocols, which, as it turns out, are perfectly suited for the job.
HLS and DASH: The Building Blocks of DVR
Every modern DVR system starts with a chunk-based streaming protocol. The two big players in this space are HTTP Live Streaming (HLS) and Dynamic Adaptive Streaming over HTTP (DASH). Both work by doing the same thing: they break a video stream into small, digestible segments, or “chunks,” that are usually just a few seconds long.
This chunking process is the secret sauce. For a normal live stream, a player just grabs the newest chunks as they’re created. For DVR, the only real difference is that we hang onto all those chunks, building a playable history of the broadcast as we go.
Think of it like a train where each car is a video chunk. In a live stream, you’re always trying to board the newest car. With DVR, you simply have a ticket that lets you walk back through all the previous cars that have already passed by.
This approach is incredibly effective. It lets a video player seamlessly request older segments to “rewind” or jump right back to the newest ones to return to the live broadcast. If you want to dive deeper, our guide on what HTTP Live Streaming is offers a great technical breakdown.
The Role of the Dynamic Manifest File
If video chunks are the bricks, the manifest file is the blueprint. A manifest is just a simple text-based playlist that gives the video player a few critical instructions:
- Available Chunks: It lists the URLs for every video segment available in the stream.
- Sequence: It lays out the correct order for playing those chunks.
- Bitrate Options: It points to different quality levels (like 1080p, 720p, 480p) that the player can switch between on the fly.
For a DVR stream, this manifest file is a living document. As each new video chunk gets recorded, the manifest is updated instantly to include a link to it. On the flip side, if you have a retention policy—say, “only keep the last 4 hours”—the manifest also removes the links to the oldest chunks as they expire.
This constant updating creates the “sliding window” that we know as DVR. When a viewer hits rewind, their player just reads the manifest, finds the URLs for older chunks, and starts grabbing them. Fast-forwarding works the same way; the player just skips ahead in the manifest’s list to request chunks from a later point in the timeline.
Why a CDN is Non-Negotiable
You could have the most elegant chunking and manifest system imaginable, but it won’t mean a thing if you can’t get those files to your viewers quickly. This is where a Content Delivery Network (CDN) isn’t just a nice-to-have; it’s absolutely essential for any serious DVR streaming video service.
A CDN is a distributed network of servers that caches your content in locations physically closer to your audience. When a user in London requests a video chunk, they get it from a server in Europe, not all the way from your origin server in California. This drastically cuts down on latency—the annoying delay between a request and a response.
For DVR, the CDN caches both the video chunks and that constantly changing manifest file. This delivers two huge wins:
- Low-Latency Playback: Caching chunks around the globe makes trick-play functions like rewind and fast-forward feel instant. There’s no frustrating lag when a user jumps around in the stream.
- Origin Server Protection: Imagine thousands of viewers all requesting different chunks from different points in time. A CDN absorbs that massive load, shielding your origin server from getting overwhelmed and crashing during a popular event.
Trying to serve a DVR-enabled stream to a large audience without a CDN is a recipe for buffering, slow load times, and a terrible user experience. It’s the critical delivery layer that makes the whole thing scale.
Advanced DVR Strategies for Scale and Profit

Running a successful DVR service is about more than just hitting the record button. Once you get past the initial setup, the real work begins: figuring out how to manage costs, navigate content rights, and actually make money. This is where you have to move from a purely technical mindset to a strategic one, balancing operational expenses with the premium experience your users expect.
The central problem is straightforward: storing every second of every stream forever is a recipe for financial disaster. Video files are huge, and cloud storage bills can spiral out of control, especially when you’re dealing with thousands of hours of HD content. To build a sustainable dvr streaming video platform, you have to think like an asset manager, making smart choices about how you store, retain, and ultimately monetize your recorded video.
Mastering Tiered Storage Models
Let’s be honest, not all of your recorded content is created equal. The final quarter of a championship game might get replayed thousands of times in the first 24 hours, while a niche broadcast from last Tuesday might not get a single view. A tiered storage model recognizes this reality by automatically moving content between different storage classes based on demand, which can slash your costs.
Think of it like a library. The newest bestsellers are right at the front for easy access (“hot storage”), while older, rarely checked-out books are moved to an archive in the back (“cold storage”).
- Hot Storage: This is your prime real estate, reserved for frequently accessed content like recordings from the last 72 hours. It uses high-performance, more expensive storage (like standard Amazon S3) to ensure instant playback.
- Cold Storage: For older content that’s gathering dust, you can shift it to a much cheaper, archival-grade tier (like Amazon S3 Glacier). Access might be a few seconds slower, but the savings are huge—often cutting storage expenses by over 50%.
The trick is to automate this process. You can set rules to automatically transition video chunks from hot to cold storage after a set period, like 30 days. This gives you the perfect blend of performance and cost efficiency without any manual effort.
Developing Smart Content Retention Policies
Beyond just where you store the files, you need a clear policy on how long you keep them. This isn’t just a technical decision; it’s a business one, driven by content licensing agreements, user expectations, and your bottom line. For instance, your rights to a major sporting event might only allow you to offer replays for 48 hours, while you might offer indefinite storage for a user’s own live stream.
Your retention policy is a direct lever for managing your two biggest operational variables: storage costs and legal compliance. A well-defined policy prevents indefinite cost scaling and ensures you adhere to all licensing terms.
When building out your policies, think about tying them to your user plans. A free or basic tier could offer a 24-hour DVR window, while a premium subscription might unlock 90 days or even unlimited storage. This not only keeps your costs in check but also creates a powerful incentive for users to upgrade.
Unlocking New Monetization Avenues
A great DVR feature set isn’t just a cool perk; it’s a goldmine for monetization opportunities that go way beyond a simple subscription fee. As the cloud DVR market continues to boom—projected to hit around USD 128.22 billion by 2032—finding creative revenue streams will be what sets you apart. You can dig into the numbers behind this growth in this detailed industry analysis.
One of the most powerful tools in your arsenal is Dynamic Ad Insertion (DAI). With DAI, you can swap out the original ad breaks in a recorded broadcast with fresh, targeted ads that are relevant to the person watching. This means a viewer catching up on a game a day later sees valuable, timely ads instead of stale ones. This process usually requires re-processing the video, and you can learn more about how that works in our guide on what video transcoding is.
Beyond just ads, you can package DVR capabilities into compelling premium offerings:
- Extended Storage Tiers: Create subscription levels based on how many hours a user can record or how long the recordings are saved.
- “Download-to-Go”: Offer a feature that lets users save a cloud recording to their device for offline viewing—a perfect upsell.
- Ad-Free Playback: Let users pay a premium to watch their recorded content without any dynamically inserted ads.
By weaving these advanced strategies into your platform, you can transform your DVR feature from a simple cost center into a powerful engine for user engagement, growth, and profit.
Putting Your DVR Workflow to the Test
Alright, let’s move from theory to practice. Building a DVR system that can handle the real world means having a solid plan for both the initial setup and the day-to-day operations. While we won’t be writing a full application here, we can walk through the core steps and see how you’d use a service like LiveAPI to drive your DVR pipeline with code.
Getting started is often surprisingly straightforward. You’ll typically make a simple API call to tell the system to start recording a specific live stream. This might involve hitting an endpoint with the stream’s ID and toggling a dvr_enabled flag to true. At the same time, you’ll set your retention window—maybe retention_hours: 72—to tell the system how long to keep the footage. Once that’s done, the platform takes over all the heavy lifting of chunking, storing, and managing the recording.
When a viewer wants to watch the recorded content, your app makes another API call. This time, you’re asking for the DVR-specific playback URL. That URL is the key—it points to the dynamic manifest that holds the entire history of the stream, giving the video player everything it needs to let users jump around the timeline.
Keeping an Eye on What Matters
Once you’re up and running, your focus has to shift to monitoring. In streaming, you can’t fix what you can’t see, and a tiny problem can snowball into a full-blown outage in minutes. Your dashboard needs to be locked onto the metrics that actually affect what your viewers see on their screens.
Here are the vital signs you absolutely have to track:
- Manifest Availability: Can the player actually get the manifest file? If it gets a 404 error, the stream is dead. You should be aiming for 99.99% uptime on this, no excuses.
- Segment Load Time: How fast are those video chunks coming down from the CDN? If you see this number spiking, you can bet your users are about to see a buffering wheel.
- Buffering Ratio: What percentage of your viewers are actually hitting that dreaded buffering screen? This metric tells you, in no uncertain terms, how good (or bad) your stream quality is.
- Latency: For live events, how big is the gap between the live action and what viewers see? This is everything for sports or any interactive broadcast.
Proactive monitoring isn’t about waiting for things to break. It’s about spotting a dip in performance before your users do, giving your team a chance to step in and fix a small problem before it becomes a massive headache.
Preparing for When Things Go Wrong
A truly professional DVR workflow is built with failure in mind. You have to assume things will break and have a backup plan ready. Every system has weak spots, and you need a specific fallback for each one.
What happens if your primary ingest server fails? You’d better have a backup ready to pick up the stream instantly, so the recording is never interrupted.
Storage can also be a point of failure; segments can get corrupted. A good practice is to run automated integrity checks on every single chunk as it’s written. This ensures bad data never makes it into the manifest in the first place. Setting up alerts for these classic problems—ingest failures, storage errors, and CDN hiccups—isn’t optional. It’s the baseline for running a reliable service that viewers can count on.
Diving Deeper: Common Questions About DVR Streaming
When you start digging into DVR for live streaming, a few practical questions always pop up. It’s one thing to understand the theory, but another to see how it plays out in the real world. Let’s tackle some of the most common ones I hear from developers and product managers.
How Much Storage Are We Really Talking About?
This is usually the first question, and for good reason—storage costs money. A single hour of a pretty standard 1080p stream at 5 Mbps will eat up about 2.25 gigabytes of space.
Now, imagine that across hundreds of channels, 24/7. The numbers get big, fast. This is exactly why a smart storage strategy isn’t just a “nice-to-have”; it’s fundamental to whether your service will be profitable.
How Do Fast-Forward and Rewind Actually Work?
Another frequent question is about the “magic” of trick-play. Without a single, massive video file to scan through, how does a player jump backward or forward so smoothly?
It’s all in the manifest. When you drag that timeline scrubber, your video player isn’t actually “scanning” anything. Instead, it’s firing off a rapid series of requests for different video chunks based on their timecodes in the manifest. The player stitches them together on the fly, creating that seamless illusion of fast-forward or rewind.
Does DVR Add a Ton of Latency to the Live Stream?
Latency is the boogeyman of live broadcasting, so it’s natural to worry that DVR will make it worse. The good news is, a well-built DVR system adds almost no extra delay to the live feed itself.
The real culprits for latency are your chunk size and how quickly your CDN can deliver them. The DVR buffer simply sits in the background, recording those chunks as they come in. It doesn’t interfere with the viewer watching at the “live edge,” which is usually just a few seconds behind the actual event.
The real trick isn’t just managing latency, but ensuring a user can jump right back to the live broadcast after they’ve been rewinding. This “snap-to-live” feature is crucial for a great user experience. It tells the player to dump its current buffer and immediately fetch the newest chunks available in the manifest.
What Happens When the Live Feed Drops?
Ah, the inevitable “what if.” Live feeds are unpredictable. What happens when the source goes down?
- At the Ingest Point: If your source stream fails, the recording simply pauses. A truly resilient setup will have a backup ingest ready to take over automatically, keeping the gap in your recording as small as possible.
- On the Player Side: The viewer’s player will just keep playing from the chunks it already has until it hits the end of the manifest. As soon as the feed is back up and new chunks start getting added, playback will resume.
Thinking through these real-world scenarios is what separates a basic DVR feature from one that’s robust and reliable enough for your audience.
Ready to build a powerful, scalable DVR streaming video experience without the infrastructure headaches? LiveAPI provides the robust APIs and reliable backend you need to get started in minutes.