Bearer token authentication is one of the most common ways to secure an API, and for good reason. At its core, it’s a security model where access is granted to whoever holds the token. Think of it like a keycard to a hotel room: as long as you have the card, you can get in. This simplicity is what makes it so powerful for modern services like LiveAPI.
What Are Bearer Tokens and Why Do They Matter?
When we talk about bearer tokens, we’re really talking about a streamlined way for an application to prove its identity without sending a username and password with every single request. After a user logs in for the first time, an authentication server hands back a unique, encrypted string of characters—that’s the bearer token.
From that point on, the client application simply includes this token in the Authorization header of its API calls. The server receives the request, inspects the token, and if it’s valid, processes the request. It’s a clean, efficient handshake.

The real magic here is that this process is stateless. The API server doesn’t have to keep a record of active sessions. All the information it needs to verify the user is either inside the token itself or referenced by it. For large-scale, distributed systems built on microservices, this is a game-changer. Trying to sync session state across dozens or hundreds of servers is a massive headache, and stateless tokens sidestep the problem entirely.
This approach didn’t just appear out of nowhere. It evolved as a practical solution to the complexities of older protocols. Back in early 2010, the OAuth 1.0 standard was notoriously difficult to implement. In response, tech leaders proposed a simpler profile called OAuth WRAP, which introduced bearer tokens. This shift drastically reduced the implementation burden, letting developers get back to building features instead of wrestling with authentication logic. For those interested, you can explore the history of these standards and see how they shaped the web we use today.
The Two Flavors of Bearer Tokens
When you start implementing bearer tokens, you’ll quickly find there are two main types to choose from. Each has its own strengths and weaknesses, and picking the right one is crucial for building a secure and performant system.
- Opaque Tokens: These are essentially random, unreadable strings. Think of them as a reference number. The token itself holds no information about the user. To validate it, your API has to send it back to the authentication server, which looks it up in a database to find the associated user details and permissions.
- JSON Web Tokens (JWTs): JWTs are the opposite—they are completely self-contained. A JWT is a digitally signed JSON object that has been encoded. This object contains “claims,” which are just pieces of information like a user ID, roles, and an expiration date. Your API can validate a JWT on its own by simply verifying its digital signature, without ever needing to call back to the authentication server.
Key Takeaway: Your choice between Opaque tokens and JWTs is a classic trade-off. Opaque tokens give you more control (like the ability to instantly revoke access), making them more secure in some scenarios. JWTs, on the other hand, offer much better performance and scalability because they don’t require that extra validation step.
Opaque Tokens vs JWTs at a Glance
Choosing between an opaque token and a JWT really comes down to the specific needs of your application. An API that needs to scale massively might lean towards JWTs, while a system handling highly sensitive data might prefer the tight control offered by opaque tokens.
To make this clearer, let’s lay out the key differences side-by-side.
| Attribute | Opaque Token | JSON Web Token (JWT) |
|---|---|---|
| Structure | A random, unreadable string with no embedded data. It’s simply a reference ID. | A structured, Base64-encoded JSON object with a header, payload, and signature. |
| Validation | Requires a network call to the authentication server to validate the token and fetch user data. | Can be validated locally by the resource server using a public key or a shared secret. |
| Ideal Use Cases | High-security environments where immediate token revocation is critical and for long-lived refresh tokens. | Stateless microservice architectures and high-performance APIs where scalability is a priority. |
Ultimately, both are valid approaches to bearer authentication. The key is to understand how their underlying mechanics—a database lookup versus cryptographic verification—affect your system’s architecture, performance, and security posture.
How to Generate and Sign Secure Bearer Tokens
Alright, let’s get into the nuts and bolts of creating the tokens themselves. This is where your authentication system comes to life. The whole process kicks off the moment a user successfully logs in. Your server takes that success, crafts a special token, and signs it with a secret key before handing it back to the client.
https://www.youtube.com/embed/YT76dnHzG6c
The gold standard for this is the JSON Web Token, or JWT. Think of a JWT as a self-contained digital passport. It’s a compact, secure string that bundles user information (the “claims”) and a cryptographic signature into one neat package. This structure is brilliant because it lets your API check if the token is legit on its own, without having to ping an auth server every single time a request comes in.
Building the JWT Payload
The payload is the heart of the JWT. It’s where you put all the essential info about who the user is and what the token is for. While you can certainly add custom data specific to your app, there are a handful of standardized “claims” you should always include to keep things secure and interoperable.
Here are the non-negotiables:
sub(Subject): This is the user’s unique ID. Use something stable that won’t ever change, like a UUID from your database, not their email address.iss(Issuer): This simply identifies which service created the token. For us, that might behttps://auth.liveapi.com.aud(Audience): This specifies who the token is for. It should be your API’s identifier, likehttps://api.liveapi.com. This is a great security check—it stops a token meant for one service from being used on another.iat(Issued At): A simple timestamp marking when the token was created.exp(Expiration Time): This is absolutely critical. It’s a timestamp that tells your API when the token is no longer valid. I can’t stress this enough: keep your tokens short-lived. 15 minutes is a very common and secure lifespan.
Nailing these claims gives you a solid foundation, ensuring every token is specific, time-bound, and tied directly to one user.
A word of caution: The JWT payload is just Base64 encoded, not encrypted. Anyone who gets their hands on the token can easily read what’s inside. So, don’t stuff sensitive personal data in there. Stick to identifiers, roles, and other non-sensitive info.
Code Examples for Token Generation
With modern libraries, creating and signing a JWT is surprisingly straightforward. Let’s see how you’d generate a token for a user with the ID user-123 that expires in 15 minutes.
Here’s a common setup in Node.js using the popular jsonwebtoken library. Notice we’re pulling the secret key from an environment variable—never hard-code secrets!
// Node.js example using jsonwebtoken const jwt = require(‘jsonwebtoken’);
// Fetch the secret key from environment variables const JWT_SECRET = process.env.JWT_SECRET;
function generateUserToken(userId) { const payload = { sub: userId, iss: ‘https://auth.liveapi.com‘, aud: ‘https://api.liveapi.com‘, };
const options = { expiresIn: ’15m’, // 15 minutes algorithm: ‘HS256’ // Symmetric algorithm };
// Sign the token and send it back return jwt.sign(payload, JWT_SECRET, options); }
const token = generateUserToken(‘user-123’); console.log(token);
The approach in Python with the PyJWT library is quite similar. You build the payload dictionary, define the signing algorithm, and use your secret to produce the final token.
Python example using PyJWT
import jwt import datetime import os
Fetch the secret key from environment variables
JWT_SECRET = os.environ.get(‘JWT_SECRET’)
def generate_user_token(user_id): payload = { ‘sub’: user_id, ‘iss’: ‘https://auth.liveapi.com‘, ‘aud’: ‘https://api.liveapi.com‘, ‘iat’: datetime.datetime.utcnow(), ‘exp’: datetime.datetime.utcnow() + datetime.timedelta(minutes=15) }
token = jwt.encode(
    payload,
    JWT_SECRET,
    algorithm='HS256' # Symmetric algorithm
)
return token
Generate a token for a user
token = generate_user_token(‘user-123’) print(token) These snippets show just how routine this process becomes once you have the basic structure in place.
Choosing Your Signing Algorithm
The last piece of the puzzle is signing the token. The signature is your guarantee that the token’s payload hasn’t been messed with since you created it. You generally have two families of algorithms to choose from.
| Algorithm Type | How It Works | Best For |
|---|---|---|
| Symmetric (HS256) | Uses a single shared secret key to both sign and verify the token. | Simple, monolithic applications where the same service is creating and checking tokens. |
| Asymmetric (RS256) | Uses a private key to sign and a separate public key to verify. | Distributed systems or microservices. You can safely share the public key with other services for verification without exposing the all-powerful private key. |
So, which one should you use? It really depends on your architecture. If you have one big application handling everything, HS256 is fast, simple, and gets the job done. But if you’re building a system with multiple microservices that all need to validate tokens, the added security of RS256 is definitely the way to go.
Implementing Token Validation in Your API
Once your authentication server mints a signed token, its job is only half done. The real test is when a client actually uses that token to call your API. A token is worthless without solid validation, and this is where you build the security gate that protects your valuable resources.
Think of it this way: every single request hitting a protected endpoint has to be inspected before it gets anywhere near your business logic. The best way to handle this is with middleware that intercepts every incoming call. This middleware acts as your bouncer, pulling the token out of the request and putting it through a series of checks. If it fails at any point, the request is shut down immediately—usually with a 401 Unauthorized response—stopping a bad actor cold.
The Essential Token Validation Checklist
Your validation logic needs to be thorough. It’s not enough to just see that a token exists. You have to scrutinize it like a customs agent checking a passport.
Here’s the sequence of checks your API absolutely must perform on every token:
- Find the Token: First, you have to get the token out of the request. The industry standard is the
Authorizationheader, formatted asBearer <token>. Your code needs to parse this string to isolate the actual token. - Verify the Signature: This is the most important cryptographic step. Your API needs the right public key (for asymmetric algorithms like RS256) or the shared secret (for symmetric ones like HS256) to confirm the token’s signature is legit. A signature mismatch means the token was either tampered with or signed by an imposter. It’s an instant failure.
- Check the Standard Claims: With the signature verified, you can now trust the payload. Look at the claims inside. You must check the
exp(expiration) claim to make sure the token isn’t expired and thenbf(not before) claim to prevent it from being used too early. - Confirm the Issuer and Audience: Finally, check the
iss(issuer) andaud(audience) claims. Does theissmatch your trusted authentication server? Is theaudvalue set to your specific API? This is a critical check that stops a token generated for one service from being accepted by another.
This entire process is the foundation of secure bearer token authentication. The core security challenge is simple: if you have the token, you have access. An attacker who steals a token can impersonate the user, so rigorously verifying these claims on every single request is your best defense. For a deeper dive, you can learn more about the principles of bearer token security and how these checks build a robust system.
Practical Validation with Middleware
Let’s see what this looks like in actual code. Thankfully, modern web frameworks make it pretty straightforward to plug this kind of logic in as middleware that runs before your route handlers.
Here’s a conceptual example for a Node.js API using Express and the popular jsonwebtoken library. You would apply this middleware function to any route you want to protect.
// Node.js/Express middleware for JWT validation const jwt = require(‘jsonwebtoken’);
const JWT_PUBLIC_KEY = process.env.JWT_PUBLIC_KEY; // Or your secret
function validateToken(req, res, next) { const authHeader = req.headers[‘authorization’]; const token = authHeader && authHeader.split(‘ ‘)[1];
if (token == null) { return res.sendStatus(401); // No token, unauthorized }
jwt.verify(token, JWT_PUBLIC_KEY, { algorithms: [‘RS256’], // Specify your algorithm issuer: ‘https://auth.liveapi.com‘, audience: ‘https://api.liveapi.com‘ }, (err, user) => { if (err) { // Common errors: TokenExpiredError, JsonWebTokenError console.error(‘Token validation error:’, err.message); return res.sendStatus(403); // Invalid token, forbidden } // Attach user payload to the request object for later use req.user = user; next(); // Token is valid, proceed to the route handler }); }
// Apply the middleware to a protected route // app.get(‘/api/protected-data’, validateToken, (req, res) => { … });
The pattern in a Python/Flask application is quite similar. You’d typically use a decorator to wrap protected routes, performing the same checks with the PyJWT library.
Python/Flask decorator for JWT validation
from functools import wraps from flask import request, jsonify import jwt import os
JWT_PUBLIC_KEY = os.environ.get(‘JWT_PUBLIC_KEY’)
def token_required(f): @wraps(f) def decorated(*args, **kwargs): token = None if ‘authorization’ in request.headers: # Extract ‘Bearer ‘ token = request.headers[‘authorization’].split(‘ ‘)[1]
    if not token:
        return jsonify({'message': 'Token is missing!'}), 401

    try:
        data = jwt.decode(
            token,
            JWT_PUBLIC_KEY,
            algorithms=['RS256'],
            audience='https://api.liveapi.com',
            issuer='https://auth.liveapi.com'
        )
        # Pass the decoded payload to the route
        current_user = data['sub']
    except jwt.ExpiredSignatureError:
        return jsonify({'message': 'Token has expired!'}), 403
    except jwt.InvalidTokenError:
        return jsonify({'message': 'Token is invalid!'}), 403

    return f(current_user, *args, **kwargs)
return decorated
Usage on a Flask route
@app.route(‘/protected’)
@token_required
def protected_route(current_user):
…
Expert Tip: Notice how the validation libraries do the heavy lifting. By passing options like
audienceandissuerdirectly into theverifyordecodefunction, you’re telling the library to enforce the entire checklist for you. This makes your code cleaner and, more importantly, reduces the risk of accidentally skipping a critical validation step. By applying this middleware consistently, you create a secure perimeter around your LiveAPI resources.
Advanced Security Patterns for Token Management
Once you have a solid token generation and validation pipeline in place, you’ve won half the battle. The other half is mastering the full lifecycle of a token—from the moment it’s issued until it’s safely destroyed. This is where a good authentication system becomes a great one.
Effective bearer token authentication isn’t just a one-and-done check. It’s about handling renewals, secure storage, and having a bulletproof plan for when things go wrong. Let’s dig into some production-grade strategies that will seriously harden your security posture.
The Refresh Token Pattern
One of the classic dilemmas in API security is balancing user experience against risk. If you issue long-lived access tokens, users love the convenience, but it creates a massive window of opportunity for an attacker if a token gets stolen. On the flip side, short-lived tokens are much safer but would drive users crazy by forcing them to log in constantly.
This is exactly the problem the refresh token pattern was designed to solve. It’s a clever architecture that gives you the best of both worlds:
- Access Tokens: These are your workhorses—short-lived JWTs with an expiration of just 15-30 minutes. They are sent with every API request to prove the user has permission. Because their lifespan is so brief, the risk of a compromised token is drastically lower.
- Refresh Tokens: These are the key to a seamless user experience. They are long-lived, opaque tokens that can last for days or even months. Their only job is to ask the authentication server for a new access token when the old one expires. They’re stored securely and sent far less frequently.
When an access token expires, the client application simply sends the refresh token to a dedicated endpoint, gets a new access token, and carries on. The user never even notices.
Secure Client-Side Token Storage
How you store tokens on the client is one of the most critical security decisions you’ll make. The two main choices, localStorage and HTTP-only cookies, come with significant trade-offs, especially when it comes to defending against Cross-Site Scripting (XSS) attacks.
Key Insight: An XSS attack happens when a malicious script gets injected into your website. If that script can read
localStorage, it can steal any authentication tokens you’ve stored there and use them to impersonate your users.
Storing your tokens in a secure, HTTP-only cookie is hands-down the best practice here. The HttpOnly flag is a simple but powerful defense, making the cookie completely inaccessible to JavaScript. This effectively neuters any XSS attack trying to steal the token.
While it can be slightly more complex to set up, particularly if your API and web app live on different domains, the security payoff is enormous.
This diagram breaks down how your API server should handle an incoming request with a bearer token.
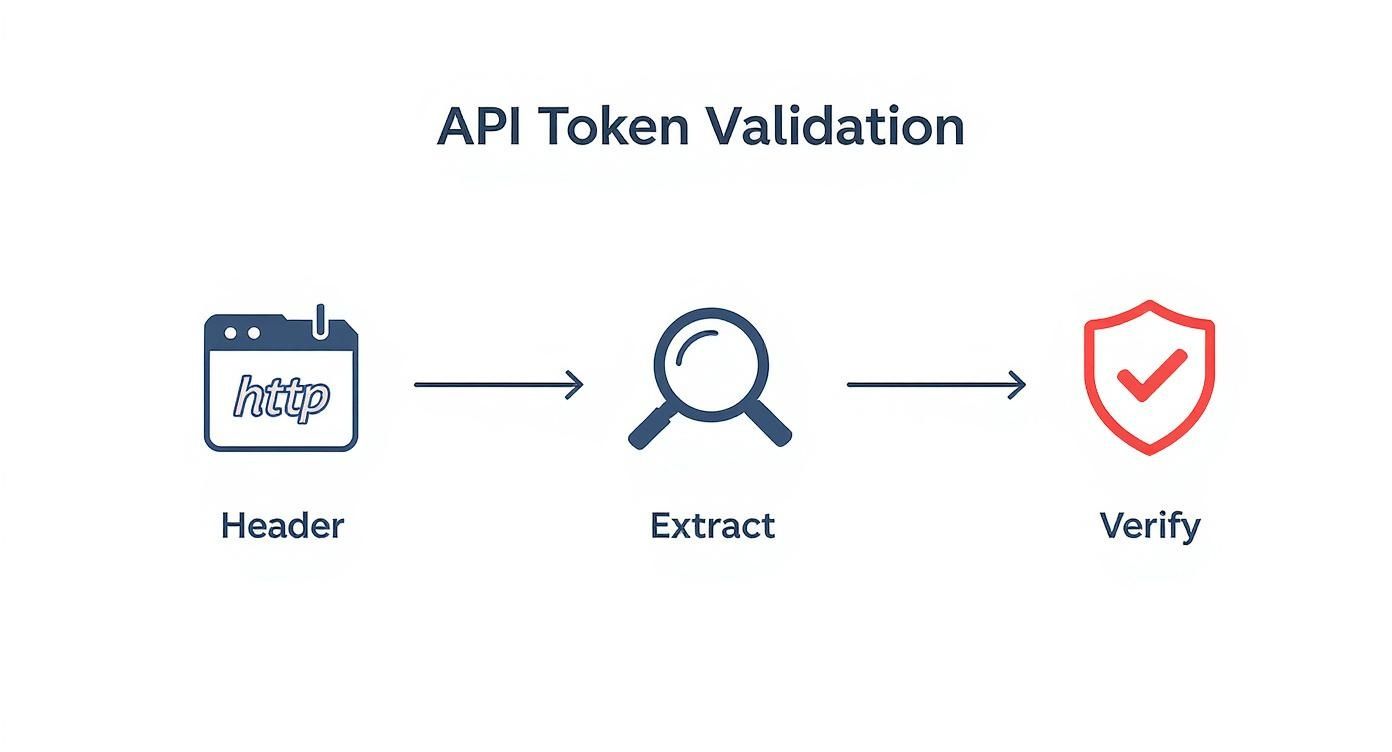
It’s a clear visual of the server’s role: extract the token from the header, then rigorously verify its signature and claims to keep the API secure.
Choosing where to store tokens on the client is a critical decision with direct security implications. This table breaks down the pros and cons of the two most common methods.
Client-Side Token Storage Comparison
| Method | Security Benefit | Primary Risk | Best For |
|---|---|---|---|
localStorage |
Simple to implement with JavaScript. | Vulnerable to XSS attacks; any script on the page can access and steal the token. | Non-sensitive data or applications where XSS risk is fully mitigated. |
| HTTP-only Cookie | Inaccessible to JavaScript, providing strong XSS protection. Can also be flagged as Secure to ensure it’s only sent over HTTPS. |
Susceptible to CSRF attacks, which require additional protection like anti-CSRF tokens. | Storing sensitive authentication tokens like access and refresh tokens. |
Ultimately, HTTP-only cookies offer a fundamentally more secure foundation for storing authentication credentials, protecting them from the most common web-based attacks.
Dealing with Token Revocation
One of the defining features of JWTs is that they are stateless, which is great for scalability. But this introduces a challenge: once you issue a JWT, it’s valid until it expires. There’s no built-in “off switch.” So, what do you do if a user’s account is compromised, or they log out and expect to be logged out everywhere, right now?
You can’t just reach out and invalidate a JWT that’s already out in the wild. The solution is to re-introduce a tiny bit of state into your system by maintaining a token denylist.
Here’s a practical way to implement it:
- Add a unique identifier, like a
jti(JWT ID) claim, to every access token you issue. - When a token needs to be revoked (e.g., on logout), you add its
jtito a denylist. This list is best stored in a fast in-memory database like Redis. - Finally, update your API’s validation middleware. Before accepting any token, it must perform one extra check: does this token’s
jtiexist in the denylist? If it does, reject the request.
This pattern gives you the power to kill a session on demand, closing one of the most significant security gaps in a purely stateless JWT architecture.
Production Monitoring and Rate Limiting
In a live environment, token management isn’t just about security protocols; it’s also about operational health and preventing abuse. That’s why implementing rate limiting on your authenticated endpoints is non-negotiable.
By tracking how many requests are made with a specific token over a given time, you can stop a single compromised key from being used to hammer your system. A common policy might be to limit a user to 1,000 API calls per hour.
Beyond that, you should be actively monitoring token usage patterns to spot weird behavior. A sudden flood of requests from one user’s token or API calls originating from unusual geographic locations could be a red flag for a compromised account. This kind of telemetry is invaluable for keeping your LiveAPI services stable and secure.
Using Bearer Tokens in Specialized Environments
Standard API calls are one thing, but what happens when you throw a Content Delivery Network (CDN) or live video streaming into the mix? In these more complex setups, simply passing an Authorization: Bearer <token> header doesn’t quite cut it. You need a smarter approach to secure both your API and the content being served from all corners of the globe.
This is especially true for platforms like LiveAPI. A user needs to authenticate to get access to a video stream, but the video segments themselves are delivered from a massive network of CDN servers. Trying to use the same bearer token for both the initial API call and every single video chunk is not only inefficient but also a security headache.

The problem boils down to what CDNs are built for. They excel at high-speed, cached content delivery, not running complex token validation logic at the edge for thousands of tiny files per second. Forcing a CDN like CloudFront to validate a JWT for every little .ts video file would kill performance.
The Right Tool for the Right Job
This is where a hybrid strategy is a lifesaver. Instead of forcing one tool to do everything, you use two different security mechanisms, each playing to its strengths.
- Bearer Tokens for API Authorization: Your client app uses a standard bearer token to make a secure call to your API—say,
/api/v1/stream/start. This is the classic use case for bearer token authentication, where your server validates the token to confirm the user is allowed to watch the content. - Signed URLs for Content Delivery: Here’s the key part. Once your API validates the bearer token, it doesn’t return the video directly. Instead, it generates a set of signed URLs for the video manifest and media segments. These URLs have a temporary access token baked right into their query parameters, which is something a CDN can easily and quickly validate.
This dual approach creates a perfect separation of concerns. The bearer token protects your application’s business logic, while the signed URLs protect the actual media files sitting on the CDN.
A Real-World Streaming Architecture
Let’s walk through how this plays out in a real streaming platform when a user hits “play” on a live video.
- Initial API Call: The client sends a request to your API, tucking its bearer token into the
Authorizationheader. This is the first gate, authenticating the user and confirming they have a valid subscription. - Server-Side Validation: Your API server grabs the bearer token, checks its signature, makes sure it hasn’t expired, and verifies all its claims.
- Signed URL Generation: With the token validated, the server generates a short-lived, signed URL for the main video playlist (like an HLS
.m3u8file). You’d typically make this URL valid for only 5-10 minutes. - Content Playback: The client’s video player takes this signed URL and uses it to fetch the playlist from the CDN. That playlist, in turn, contains more signed URLs pointing to the individual video segments, each with its own very short expiration time.
- CDN Verification: The CDN is configured to check the signature on these URLs before serving any content. If the signature is valid and the URL isn’t expired, it happily delivers the video chunk.
Why this works so well: This architecture keeps your core API secure and stateless while offloading the heavy lifting of content delivery to the CDN. Every user gets a unique, time-limited key to the content, which effectively stops unauthorized sharing or deep-linking to your media assets.
This model strikes the perfect balance between robust security and the high-performance demands of modern media delivery. It uses bearer token authentication for what it does best—securing application logic—while employing a far more suitable mechanism for protecting distributed assets. It’s a powerful pattern for building scalable and secure streaming services.
Common Questions About Bearer Token Authentication
When you start working with bearer token authentication, a few practical questions almost always pop up. Getting the answers right is crucial for building a system that’s both secure and user-friendly, so let’s dig into the common challenges I see developers face.
One of the first puzzles to solve is the token lifecycle itself. How long should a token live? And how do you keep a user logged in without creating a massive security hole?
How Should I Handle Token Expiration and Refreshing?
The go-to strategy here is a two-token system: a short-lived access token paired with a long-lived refresh token. Think of the access token as a single-use key to a hotel room—it’s only good for a short time. I typically recommend setting its lifespan to just 15 minutes. This drastically shrinks the window of opportunity for an attacker if the token is ever compromised.
When that access token inevitably expires, your application shouldn’t just fail. Instead, it should be built to gracefully handle the 401 Unauthorized response from the API. Your client-side code can then use the long-lived refresh token to silently request a brand-new access token from your authentication server and immediately retry the original API call. The user never even notices.
This approach gives you the best of both worlds:
- Top-Notch Security: The fleeting nature of the access token minimizes risk.
- Smooth User Experience: No one gets booted out mid-session.
- Tighter Control: You can even rotate refresh tokens, issuing a new one every time the old one is used, which is a fantastic security practice.
What Is the Most Secure Way to Store Tokens Client-Side?
For my money, the best place to store tokens on the client is in a secure, HTTP-only cookie. The magic is in the HttpOnly flag, which makes the cookie completely inaccessible to any client-side JavaScript. This is your number one defense against Cross-Site Scripting (XSS) attacks, where an attacker tries to inject malicious code to steal sensitive data.
You’ll often see localStorage used because it’s simple, but it’s also wide open to any script running on your page. If an attacker finds an XSS vulnerability, they can grab any token stored there in a heartbeat. Unless you’ve implemented a rock-solid Content Security Policy (CSP), HTTP-only cookies are the clear winner for storing credentials.
How Do I Revoke a Token?
This is where JWTs can be tricky.
Because JWTs are stateless by design, you can’t simply “turn off” a token that’s already been issued. This creates a challenge when an account is compromised or a user explicitly logs out.
Since the token itself contains all the information needed for validation, your API server doesn’t need to check back with a central authority. But what happens when you need to invalidate a token now?
The standard solution is to maintain a token denylist. This is essentially a list of revoked token IDs stored in a high-speed cache like Redis. When a user logs out or a token is reported stolen, you add its unique identifier (the jti claim is perfect for this) to the list. Then, your API’s validation logic gets a new step: before accepting any token, it first checks if its jti is on the denylist. This re-introduces a bit of state but gives you the power to revoke access instantly when you need it most.
At LiveAPI, we provide the robust infrastructure you need to build secure, scalable video applications, handling the complexities of authentication and content delivery so you can focus on creating amazing user experiences. Learn more about our platform.